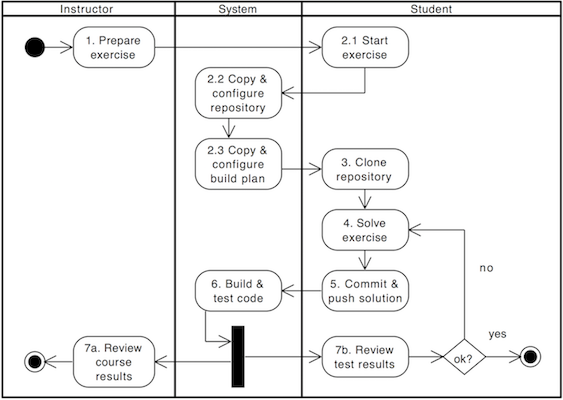
Conducting a programming exercise consists of 7 steps distributed among
instructor, Artemis and students:
Instructor prepares exercise: Set up a repository containing the
exercise code and test cases, build instructions on the CI server,
and configures the exercise in Artemis.
Student starts exercise: Click on start exercise on Artemis which
automatically generates a copy of the repository with the exercise
code and configures a build plan accordingly.
Optional: Student clones repository: Clone the personalized
repository from the remote VCS to the local machine.
Student solves exercise: Solve the exercise with an IDE of choice
on the local computer or in the online editor.
Student uploads solution: Upload changes of the source code to
the VCS by committing and pushing them to the remote server (or by
clicking submit in the online editor).
CI server verifies solution: verify the student’s submission by
executing the test cases (see step 1) and provide feedback which
parts are correct or wrong.
Student reviews personal result: Reviews build result and
feedback using Artemis. In case of a failed build, reattempt to solve
the exercise (step 4).
Instructor reviews course results: Review overall results of all
students, and react to common errors and problems.
The following activity diagram shows this exercise workflow.
Artemis and its version control and continuous integration infrastructure is independent of the programming language and thus supports
teaching and learning with any programming language that can be compiled and tested on the command line.
Instructors have a lot of freedom in defining the environment (e.g. using build agents and Docker images) in which student code is executed and tested.
To simplify the setup of programming exercises, Artemis supports several templates that show how the setup works.
Instructors can still use those templates to generate programming exercises and then adapt and customize the settings in the repositories and build plans.
The support for a specific programming language templates depends on the used continuousintegration system. The table below gives an overview:
Not all templates support the same feature set and supported features can also change depending on the continuous integration system setup.
Depending on the feature set, some options might not be available during the creation of the programming exercise.
The table below provides an overview of the supported features.
In case a feature has different support for different continuous integration systems, the table shows the differences between Local CI (L) and Jenkins (J).
Sequential Test Runs: Artemis can generate a build plan which first executes structural and then behavioral tests. This feature can help students to better concentrate on the immediate challenge at hand.
Static Code Analysis: Artemis can generate a build plan which additionally executes static code analysis tools.
Artemis categorizes the found issues and provides them as feedback for the students. This feature makes students aware of code quality issues in their submissions.
Plagiarism Checks: Artemis is able to automatically calculate the similarity between student submissions. A side-by-side view of similar submissions is available to confirm the plagiarism suspicion.
Package Name: A package name has to be provided
Solution Repository Checkout: Instructors are able to compare a student submission against a sample solution in the solution repository
Note
Only some templates for LocalCI support SequentialTestRuns at the moment.
Note
Static Code Analysis for some exercises are only supported for LocalCI at the moment.
Note
Instructors are still able to extend the generated programming exercises with additional features that are not available in one specific template.
We encourage instructors to contribute improvements to the existing templates or to provide new templates. Please contact Stephan Krusche and/or create Pull Requests in the GitHub repository.
The classical testing frameworks, like JUnit for example, allow writing whitebox tests.
This enforces many assumptions about the structure of the source code under test,
like the class and method names and even the exact method signatures.
This implies for a programming exercise that you have to specify all the structural aspects
if your test suite should be able to run on the student submissions.
That maybe is okay or even desired for a beginner course,
but for advanced courses this is a downside,
because without making their own decision about the structure of their source code,
the students cannot collect experience in this important aspect of programming through your exercises.
To be able to include the structural aspect of programming in your programming exercises,
without losing the ability to test submissions automatically, you can use DejaGnu.
It allows you to write blackbox tests for command line interfaces of applications.
The tests are written in Expect Script, an extension to the Tcl scripting language.
Expect is a traditional Unix utility for automatic interactions with programs that expose a text terminal
interface in a robust way.
The test script starts the program to test as own process (possibly several times) and interactively controls
it by textual inputs via the standard input.
The script then reads the respective outputs and can make ‘assertions’ (e.g. exact or regex matching) on them.
Based on the obtained output it can also decide on the next inputs, thereby simulating how a user might interact with the program.
Thus, for the exercises you only have to specify the syntax of the command line interface
and at least a rough guidance for the output format.
The source code structure can be all up to the students as far as you want.
An assessment of the quality of the students’ source code structure can be made with manual assessment after the submission deadline.
The template for this exercise type already uses Maven to compile the students’ code.
Therefore, it could also be extended to additionally run regular unit tests (e.g. for architecture tests that ensure no cyclic package dependencies exist) and report the results for both to the student.
For the usage of DejaGnu consult the official documentation
and the initial content of the test-repository created by Artemis for this exercise type.
The DejaGnu-specific files are stored inside the testsuite directory.
There, inside the ….tests directory you can find three examples for test execution scripts.
For example a PROGRAM_test{addx}{} puts addx into the program and expects no output.
The PROGRAM_test and other shared helper functions are defined inside config/default.exp.
The variables in screaming snake case in config/default.exp (e.g. MAIN_CLASS) will be replaced to actual values in a previous build plan step.
For example, the build plan searches for the Java class with the main method and replaces MAIN_CLASS accordingly.
The best documentation of Expect
can be found in the book Exploring Expect.
However, to get started, the Artemis default template already contains quite a few reusable helper functions in config/default.exp for common input/output use-cases.
With this exercise type it is quite easy to reuse existing exercises of the
Praktomat autograder system with the Artemis platform.
Configure Grading: Configure the way students can score points in the exercise. Hide test cases that should only be visible after the due date (“hidden tests”).
The guided mode has been removed. We now introduced a validation bar to navigate through sections and help the user validate the form.
For more information, watch the video below.
Artemis provides various options to customize programming exercises:
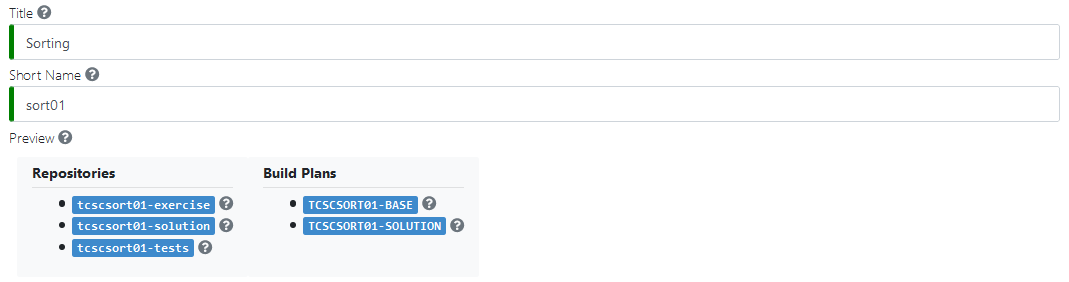
Title: The title of the exercise. It is used to create a project on the VCS server for the exercise.
Instructors can change the title of the exercise after its creation.
Short Name: Together with the course short name, the exercise short name is used as a unique identifier for
the exercise across Artemis (incl. repositories and build plans). The short name cannot be changed after the
creation of the exercise.
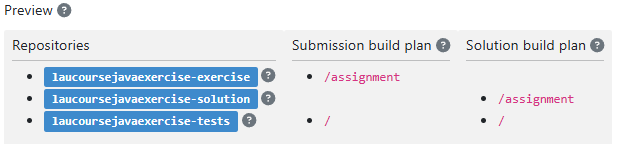
Preview: Given the short name of the exercise and the short name of the course, Artemis displays a preview of the
generated repositories and build plans.
Auxiliary Repositories: Instructors can add auxiliary repositories with a name, checkout directory, and description.
These repositories are created and added to the build plan when the exercise is created. Auxiliary repositories
cannot be changed after the creation of the exercise.
Note
Auxiliary repositories are checked out to the specified checkout directory during the automatic testing
of a student submission in case the checkout directory is set. This can be used e.g. for providing
additional resources or overwriting template source code in testing exercises.
Categories: Instructors can freely define up to two categories per exercise. The categories are visible to students
and should be used consistently to group similar kinds of exercises.
Difficulty: Instructors can give students information about the difficulty of the exercise.
Participation: The participation mode determines whether students work on the exercise alone or in teams. Cannot be changed after the exercise creation.
Learn more about team exercises here.
Team size: If Team mode is chosen, instructors can additionally give recommendations for the team size. Instructors/Tutors define the teams after
the exercise creation.
Allow Offline IDE: Allow students to clone their personal repository and work on the exercise with their preferred IDE.
Allow Online Editor: Allow students to work on the exercise using the Artemis Online Code Editor.
Publish Build Plan: Allow students to access and edit their personal build plan. Useful for exercises where students should
configure parts of the build plan themselves.
Note
At least one of the options Allow Offline IDE and Allow Online Editor must be active
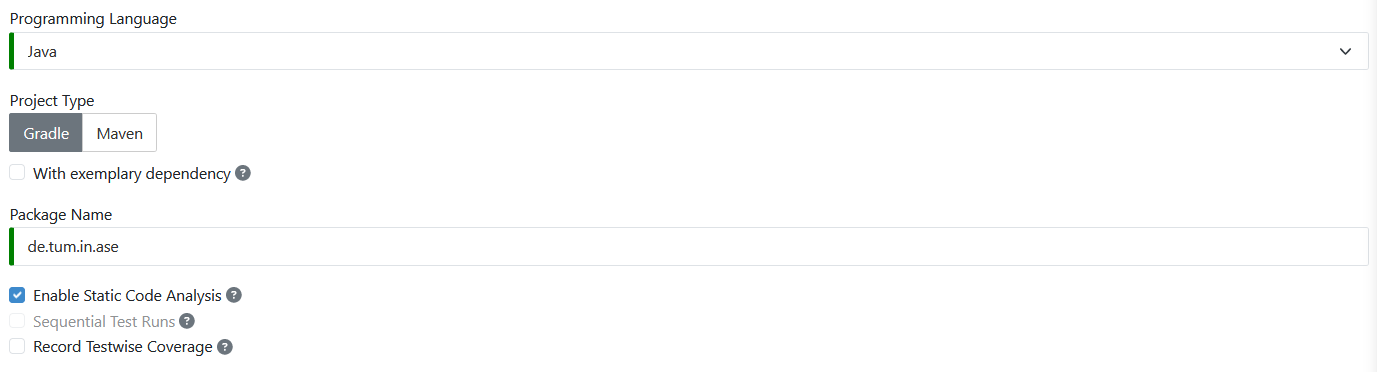
Programming Language: The programming language for the exercise. Artemis chooses the template accordingly.
Refer to the programming exercise features for an overview of the supported features for each template.
Project Type: Determines the project structure of the template. Not available for all programming languages.
With exemplary dependency: Adds an external Apache commons-lang dependency to the generated project as an example
how maven dependencies should be used with Artemis exercises. Only available for Java exercises.
Package Name: The package name used for this exercise. Not available for all programming languages.
Enable Static Code Analysis: Enable static code analysis for the exercise.
The build plans will additionally execute static code analysis tools to find code quality issues in the submissions.
This option cannot be changed after the exercise creation. Artemis provides a default configuration for the static code analysis tools
but instructors are free to configure the static code analysis tools.
Refer to the programming exercise features to see which programming languages support static code analysis.
Sequential Test Runs: Activate this option to first run structural and then behavior tests.
This feature allows students to better concentrate on the immediate challenge at hand.
Not supported together with static code analysis. Cannot be changed after the exercise creation.
Customize Build Plan: Activate this option if you want to customize the build plan of your exercise.
This feature is available for all programming languages, and works with LocalCI and Jenkins, Artemis provides templates for the build plan configuration.
The build plan can also be customized after the exercise creation.
Allow Custom Branches: Activate this option if students should be able to push (to) other branches than the default one.
Warning
Artemis does not show those branches in the UI, and also offers no merge support in the UI.
Pushing to other (non-default) branches does not trigger any builds, and does not create submissions.
Students are therefore fully responsible for managing their branches locally. Further features that deal with branches
in the Artemis UI are out of scope and will not be implemented in the future.
Please only activate this option if it is absolutely necessary!
Regular Expression for the branch name: The custom branch name is matched against this Java regular expression and pushing is only allowed, if it matches.
Should this exercise be included in the course / exam score calculation?
Yes: Instructors can define the maximum achievable Points and Bonus points for the exercise.
The achieved total points will count towards the total course/exam score
Bonus: The achieved Points will count towards the total course/exam score as a bonus.
No: The achieved Points will not count towards the total course/exam score.
Submission Policy: Configure an initial submission policy for the exercise.
The submission policy defines the effect that a submission has on the participation of one participant in a programming exercise.
You can choose between 3 different types of submission policies: None, Lock Repository, Submission Penalty. Those policies can be used
to limit how many times a student can submit their code and receive feedback from automated tests. The feature and configuration
is independent of programming language settings and works in combination with static code analysis penalties.
Detailed information about the different types of policies and their respective setup can be found in the section
configuring submission policies.
Note
Submission policies can only be edited on the Grading Page of the programming exercise after the initial exercise generation.
Release Date: Release date of the exercise. Students will be able to view the exercise after this date.
Start Date: Students will be able to participate in the exercise after this date.
If no value is set, students will be immediately able to participate once the exercise is released.
Automatic Tests: Every commit of a participant triggers the execution of the tests in the Test repository.
Excluded are tests, which are specified to run after the due date. This is only possible if Run Tests once after Due Date has been activated.
The tests that only run after the due date are chosen in the grading configuration.
Due Date: The deadline for the exercise. Commits made after this date are not graded.
Run Tests after Due Date: Activate this option to build and test the latest in-time submission of each student on this date.
This date must be after the due date. The results created by this test run will be rated.
Use this option to automatically execute hidden tests.
Assessment Type: Choose between Automatic Assessment and Manual Assessment. If manual assessment is active, Tutors have to manually review submissions.
Assessment Due Date: The deadline for the manual reviews. On this date, all manual assessments will be released to the students.
Example Solution Publication Date: The date when the solution repository becomes available to download for students. If left blank, example solutions are never published.
Complaint on Automatic Assessment: This option allows students to write a complaint on the automatic assessment after the due date.
This option is only available if complaints are enabled in the course or the exercise is part of an exam.
Note
Using the practice mode, students can still commit code and receive feedback after the exercise due date.
The results for these submissions will not be rated.
Manual feedback requests: Enable the feature for manual feedback requests, allowing students to request feedback before the deadline.
In this scenario, each student can initiate a single feedback request at a time. Once an instructor or tutor reviews the submitted work and provides feedback,
the student can then submit another request. This iterative process continues until the instructor or tutor has no further suggestions for the submission.
Show Test Names to Students: Activate this option to show the names of the automated test cases to the students.
If this option is disabled, students will not be able to visually differentiate between automatic and manual feedback.
Include tests into example solution: If active, the example solution also contains the test cases.
This allows students to locally run the test cases and verify their result.
Max Static Code Analysis Penalty: Available if static code analysis is active.
Determines the maximum amount of points that can be deducted for code quality issues found in a submission as a percentage (between 0% and 100%) of Points.
Defaults to 100% if left empty. Further options to configure the grading of code quality issues are available in the grading configuration.
Note
Given an exercise with 10 Points. If Max Static Code Analysis Penalty is 20%, at most 2 points will be deducted
from the points achieved by passing test cases for code quality issues in the submission.
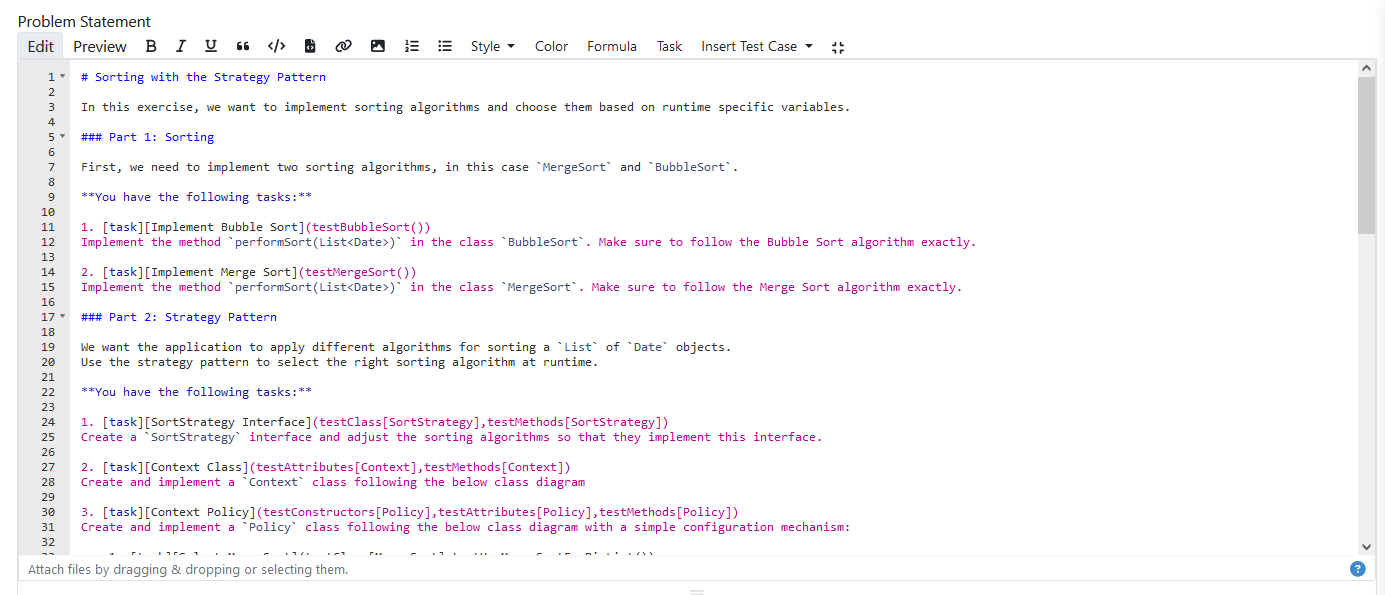
Problem Statement: The problem statement of the exercise. Refer to interactive problem statement for more information.
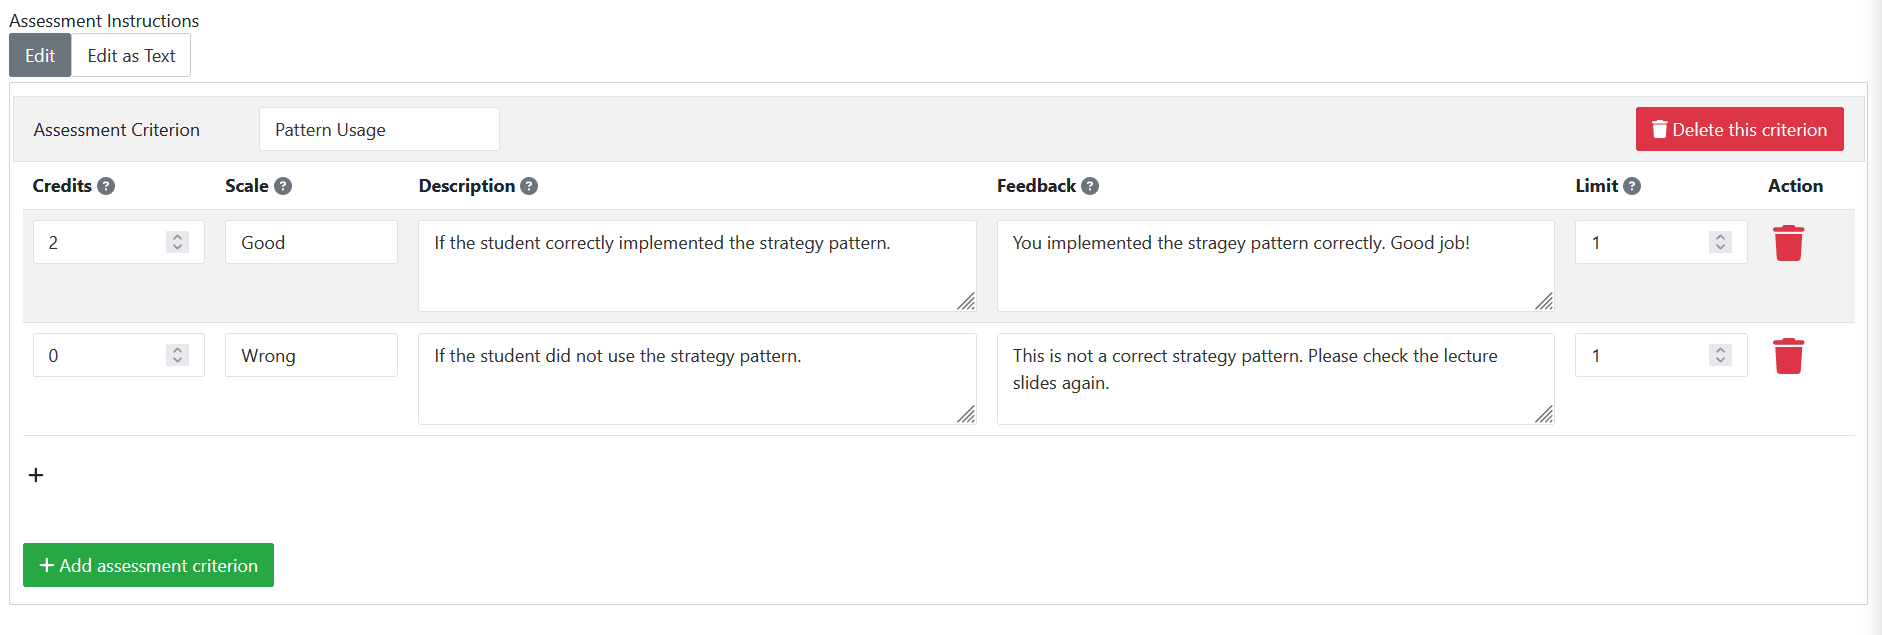
Grading Instructions: Available if Manual Review is active. Create instructions for tutors to use during manual assessment.
Click on to create the exercise
Result: Programming Exercise
Artemis creates the repositories:
Template: template code, can be empty, all students receive this code at the beginning of the exercises
Test: contains all test cases, e.g. based on JUnit and optionally static code analysis configuration files. The repository is hidden from students
Solution: solution code, typically hidden for students, can be made available after the exercise
Artemis creates two build plans
Template: also called BASE, basic configuration for the test + template repository, used to create student build plans
Solution: also called SOLUTION, configuration for the test + solution repository, used to manage test cases and to verify the exercise configuration
Alternative 1: Clone the 3 repositories and adapt the code on your local computer in your preferred development environment (e.g. Eclipse).
To execute tests, copy the template (or solution) code into a folder assignment either inside the test repository or its parent directory (depending on the selected language) and execute the tests (e.g. using mvncleantest)
Commit and push your changes via Git
Notes for Haskell: In addition to the assignment folder, the executables of the build file expect the solution repository checked out in the solution subdirectory of the test folder and also allow for a template subdirectory to easily test the template on your local machine.
You can use the following script to conveniently checkout an exercise and create the right folder structure:
#!/bin/sh# Arguments:# $1: exercise short name as specified on Artemis# $2: (optional) output folder name## Note: you might want to adapt the `BASE` variable below according to your needsif[-z"$1"];thenecho"No exercise short name supplied."exit1fiEXERCISE="$1"if[-z"$2"];then# use the exercise name if no output folder name is specifiedNAME="$1"elseNAME="$2"fi# default base URL to repositories; change this according to your needsBASE="ssh://git@artemis.tum.de:7999/$EXERCISE/$EXERCISE"# clone the test repository
gitclone"$BASE-tests.git""$NAME"&&\# clone the template repositorygitclone"$BASE-exercise.git""$NAME/template"&&\# clone the solution repositorygitclone"$BASE-solution.git""$NAME/solution"&&\# create an assignment folder from the template repositorycp-R"$NAME/template""$NAME/assignment"&&\# remove the .git folder from the assignment folderrm-r"$NAME/assignment/.git/"
Notes for OCaml: The tests expect to be placed in a folder tests next to a folder assignment containing the submission to test and a folder solution with the solution repository.
You can use the following script to conveniently checkout an exercise and create the right folder structure:
#!/bin/sh# Arguments:# $1: exercise short name as specified on Artemis# $2: (optional) output folder name## Note: you might want to adapt the `BASE` variable below according to your needs# shortname of the course to pick exercises fromPREFIX=if[-z"$1"];thenecho"No exercise short name supplied."exit1fi# full name of the exercise to loadEXERCISE="$PREFIX$1"if[-z"$2"];then# use the exercise name if no output folder name is specifiedNAME="$1"elseNAME="$2"fi# default base URL to repositories; change this according to your needsBASE="ssh://git@artemis.tum.de:7999/$EXERCISE/$EXERCISE"# clone the test repository
gitclone"$BASE-tests.git""$NAME/tests"# clone the template repository
gitclone"$BASE-exercise.git""$NAME/template"# clone the solution repository
gitclone"$BASE-solution.git""$NAME/solution"# hardlink the various assignment interfaces to ensure they stay in sync# the version in the solution repository is authoritative in case of conflict
rm"$NAME/template/src/assignment.mli"
rm"$NAME/tests/assignment/assignment.mli"
rm"$NAME/tests/solution/solution.mli"
ln"$NAME/solution/src/assignment.mli""$NAME/template/src/assignment.mli"
ln"$NAME/solution/src/assignment.mli""$NAME/tests/assignment/assignment.mli"
ln"$NAME/solution/src/assignment.mli""$NAME/tests/solution/solution.mli"
To run the tests run the following script in either the solution or template folder:
It is possible to checkout additional student repositories next to the solution and template folder to run tests on them for manual grading.
Alternative 2: Open in Artemis (in the browser) and adapt the code in the online code editor
You can change between the different repos and submit the code when needed
Edit in Editor
You write the test cases in the Test repository using the language-specific testing framework. It should create JUnit-style XML files.
The templates are configured with the following frameworks:
Check the results of the template and the solution build plan
They should not have the status
In case of a result, some configuration is wrong, please check the build errors on the corresponding build plan.
Hints: Test cases should only reference code, that is available in the template repository. In case this is not possible, please try out the option Sequential Test Runs
This section is optional. In most cases, the preconfigured build script does not need to be changed.
However, if you have additional build steps or different configurations, you can adapt the build script and docker image as needed.
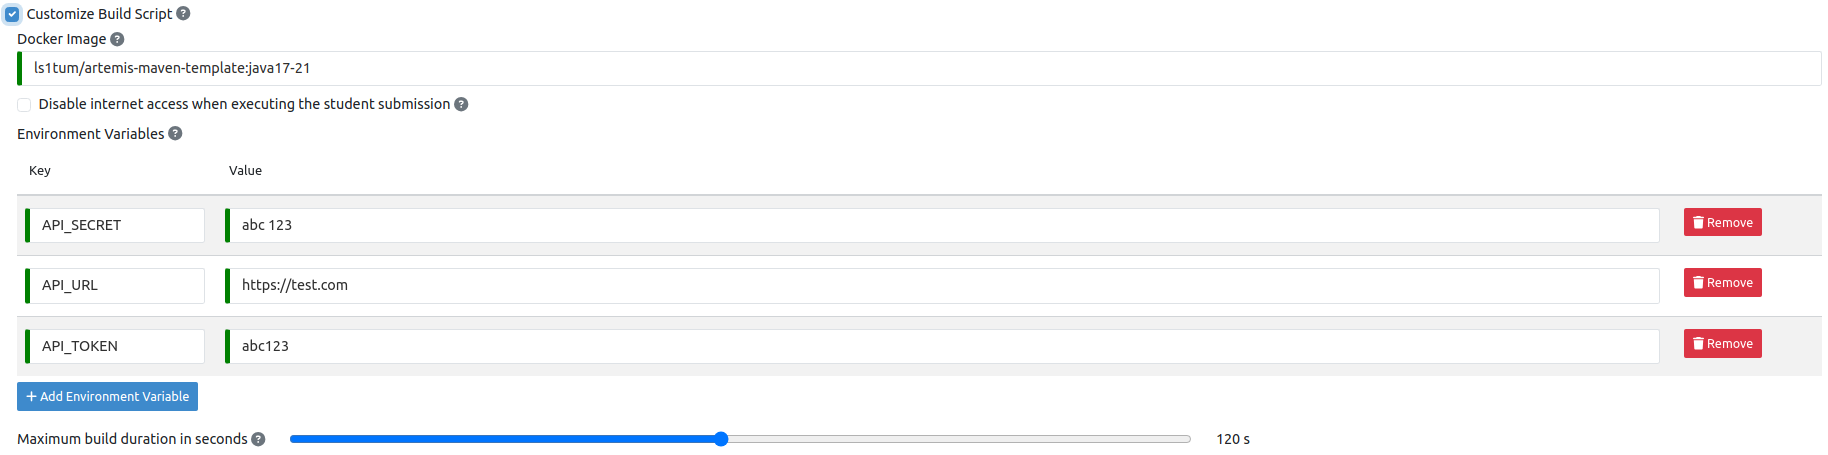
You can activate the option Customize Build Script in the programming exercise create / edit / import screen.
All changes in the configuration will be considered for all builds (template, solution, student submissions).
There are predefined build scripts in bash for all programming languages, project types and configurations (e.g. with or without static code analysis).
Most programming languages clone the test repos into the root folder and the assignment repo into the assignment folder.
This means that build files in the test repo (e.g. Gradle, Maven) typically refer to the assignment folder.
You can also use a custom docker image for the build. Make sure to publish the docker image in a publicly available repository (e.g. DockerHub). Ideally build it
for both, amd64 and arm64, architectures to make sure it runs on all platforms. Try to keep the docker image size as small as possible, because build agents need
to download it before they execute the build and might run out of space. Try to include all build dependencies to avoid that they will be downloaded in every build.
The default Java Docker image can be found on https://github.com/ls1intum/artemis-maven-docker and on https://hub.docker.com/r/ls1tum/artemis-maven-template/tags.
Hint: Try out the build of a custom programming exercise locally before you publish a custom docker image and before you upload the code to Artemis, because the
development and debugging experience is much better.
This section is optional. In most cases, the preconfigured checkout paths do not need to be changed.
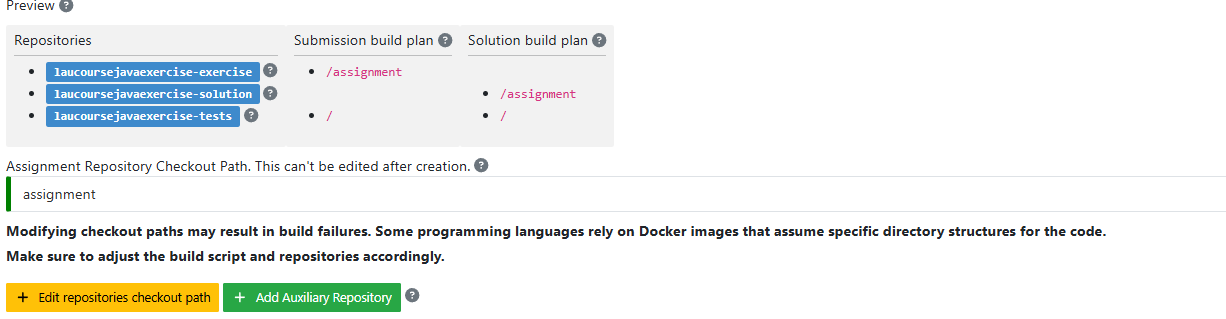
The checkout paths depend on the chosen programming language and project type. The paths are shown in the preview:
By checkout paths, we mean the paths where the repositories are cloned during the build process. For example, in Java exercises, the assignment repository is cloned into the assignment folder, the test repository is cloned into the root folder. All paths are relative to the working directory of the build plan.
If you want to change the checkout paths, you can do so by clicking on the edit repositories checkout path button. The following dialog will open:
You must then change the paths in the build script if necessary. Please refer to the Adapt the build script section on how to do this.
Warning
Changing the checkout paths can only be done in the exercise creation process. After the exercise has been created, the checkout paths cannot be changed.
Depending on the programming language and project type, the checkout paths are predefined and cannot be changed. For example, for Java exercises, only the assignment repository path can be changed. For Ocaml exercises, the assignment, test, and solution repository paths can be changed.
Changing the checkout paths can lead to build errors if the build script is not adapted accordingly.
For C programming exercises, if used with the default docker image, changing the checkout paths will lead to build errors. The default docker image is configured to work with the default checkout paths.
This section is optional. In most cases, the default maximum build duration does not need to be changed.
The maximum build duration is the time limit for the build plan to execute. If the build plan exceeds this time limit, it will be terminated. The default value is 120 seconds.
You can change the maximum build duration by using the slider.
This section is optional. In most cases, the default container configuration does not need to be changed.
Currently, instructors can change whether the container has internet access, add additional environment variables, and configure resource limits such as CPU and memory.
Disabling internet access can be useful if instructors want to prevent students from downloading additional dependencies during the build process.
If internet access is disabled, the container cannot access the internet during the build process. Thus, it will not be able to download additional dependencies.
The dependencies must then be included/cached in the Docker image.
Additional environment variables can be added to the container configuration. This can be useful if the build process requires specific variables to be set.
Instructors can also adjust resource limits for the container.
The number of CPU cores allocated to the container can be modified, as well as the maximum amount of memory and memory swap that the container is allowed to use.
These settings help ensure that resource usage is balanced while allowing for flexibility in configuring the build environment.
If set too high, the specified values may be overwritten by the maximum restrictions set by the administrators. Contact the administrators for more information.
We plan to add more options to the container configuration in the future.
The Test repository contains files for the configuration of static code analysis tools if static code analysis was activated during the creation/import of the exercise
For Java exercises, the folder staticCodeAnalysisConfig contains configuration files for each used static code analysis tool
On exercise creation, Artemis generates a default configuration for each tool, which contains a predefined set of parameterized activated/excluded rules. The configuration files serve as a documented template that instructors can freely tailor to their needs.
On exercise import, Artemis copies the configuration files from the imported exercise
The following table depicts the supported static code analysis tools for each programming language, the dependency mechanism used to execute the tools, and the name of their respective configuration files
The Maven plugins for the Java static code analysis tools provide additional configuration options.
Note
GCC can be configured by passing the desired flags in the tasks. For more information, see GCC Documentation.
The build plans use a special task/script for the execution of the tools
Note
Instructors are able to completely disable the usage of a specific static code analysis tool by removing the plugin/dependency from the execution mechanism.
In case of Maven plugins, instructors can remove the unwanted tools from the pom.xml or build.gradle.
Alternatively, instructors can alter the task/script that executes the tools in the build plan.
PMD and PMD CPD are a special case as both tools share a common plugin. To disable one or the other, instructors must delete the execution of a tool from the build plan.
Save the current grading configuration of the open tab
Reset the current grading configuration of the open tab to the default values. For Test Case Tab, all test cases are set to weight 1, bonus multiplier 1, and bonus points 0. For the Code Analysis Tab, the default configuration depends on the selected programming language.
Re-evaluates all scores according to the currently saved settings using the individual feedback stored in the database.
Trigger all build plans. This leads to the creation of new results using the updated grading configuration.
Two badges display if the current configuration has been saved yet and if the grading was changed. The following graphic visualizes how each action affects the grading page state:
Warning
Artemis always grades new submissions with the latest configuration but existing submissions might have been graded with an outdated configuration. Artemis warns instructors about grading inconsistencies with the Updated grading badge.
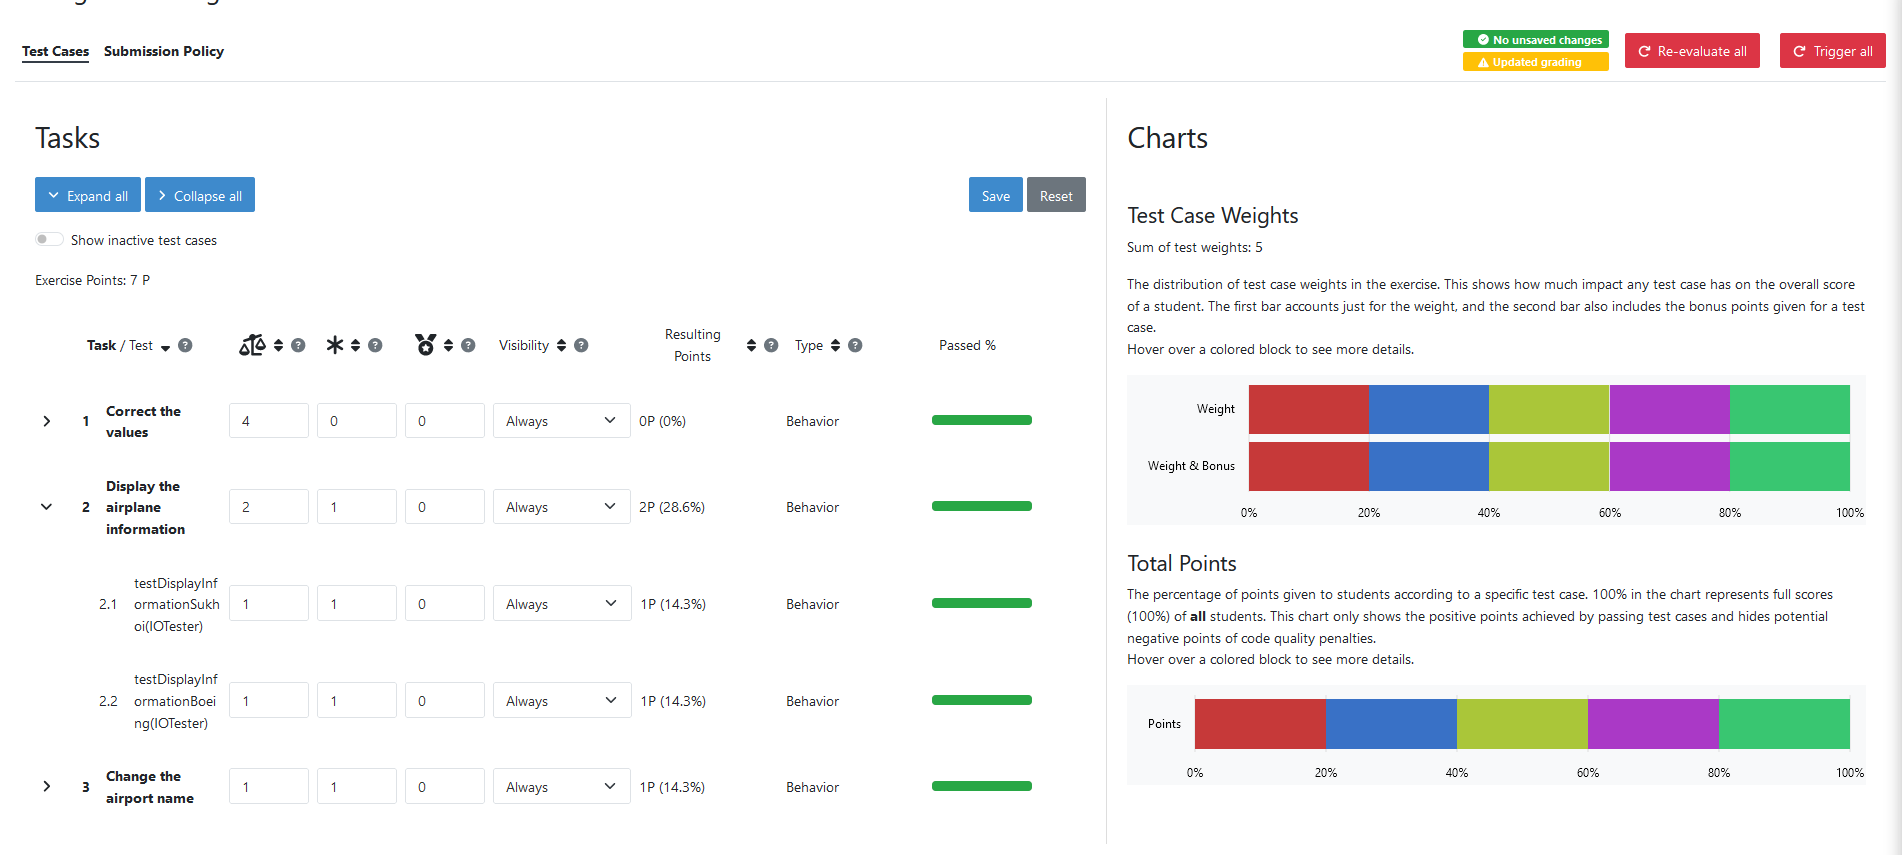
Test Case Tab: Adapt the contribution of each test case to the overall score or set the grading based on entire tasks.
To get a better understanding of the feature, you can watch the following video:
Note
Artemis registers the tasks and test cases defined in the Test repository using the results generated by Solution build plan. The test cases are only shown after the first execution of the Solution build plan.
Warning
If your problem statement does not contain any tasks, grading based on tasks will not be available.
You can still configure the grading based on test cases.
On the left side of the page, instructors can see or configure the test case settings.
Task/Test Name: Name of the task or test case. Task names are highlighted in bold and are defined in the problem statement whereas the test name is defined in the Test repository.
Weight: The points for a test case are proportional to the weight (sum of all weights as the denominator) and are calculated as a fraction of the maximum points. For tasks, the chosen weight gets evenly distributed across all test cases.
Warning
Bonus points for an exercise (implied by a score higher than 100%) are only achievable if at least one bonus multiplier is greater than 1 or bonus points are given for a test case
Bonus multiplier: Allows instructors to multiply the points for passing a test case without affecting the points rewarded for passing other test cases. For tasks the, chosen multiplier gets set for all test cases contained.
Bonus points: Add a flat point bonus for passing a test case. When setting this option for tasks the chosen bonus points get evenly distributed across all test cases.
Visibility: Select the visibility of feedback to students for this test case. If set for a task the chosen option will be set for all the test cases contained.
Always: Feedback associated with this test case is visible to students directly after the automatic grading process for their submission.
After Due Date: Feedback associated with this test case is visible to students only after the due date for this exercise has passed.
Tutors and Instructors are able to see the feedback before the due date.
If for some students an individual due date is set, the detailed feedback for those tests is invisible to all other students until the exercise submission is no longer possible for all students.
Other students can however still see if the tests passed or failed and receive points accordingly, even if the latest individual due has not passed yet.
Warning
For manual assessments, all feedback details will be visible to this student, even if the due date has not passed yet for others.
Tutors can start the manual assessment for all students with the regular due date as soon as it has passed.
Set an appropriate assessment due date in the exercise settings to make sure that students cannot tell still working students about the test case details.
Never: Feedback associated with this test case is never visible to students even after the due date for this exercise has passed.
Tutors and Instructors are able to see the feedback before and after the due date, e.g. when manually assessing submissions.
Additionally, results of this test case are not considered in the student score calculation.
Passed %: Displays statistics about the percentage of participating students that passed or failed the test case
Note
Example 1: Given an exercise with 3 test cases, maximum points of 10 and 10 achievable bonus points. The highest achievable score is \(\frac{10+10}{10}*100=200\%\). Test Case (TC) A has weight 2, TC B and TC C have weight 1 (bonus multipliers 1 and bonus points 0 for all test cases). A student that only passes TC A will receive 50% of the maximum points (5 points).
Note
Example 2: Given the configuration of Example 1 with an additional bonus multiplier of 2 for TC A. Passing TC A accounts for \(\frac{2*2}{2+1+1}*100=100\%\) of the maximum points (10). Passing TC B or TC C accounts for \(\frac{1}{4}*100=25\%\) of the maximum points (2.5). If the student passes all test cases he will receive a score of 150%, which amounts to 10 points and 5 bonus points.
Note
Example 3: Given the configuration of Example 2 with additional bonus points of 5 for TC B. The points achieved for passing TC A and TC C do not change. Passing TC B now accounts for 2.5 points plus 5 bonus points (7.5). If the student passes all test cases he will receive 10 (TC A) + 7.5 (TC B) + 2.5 (TC C) points, which amounts to 10 points and 10 bonus points and a score of 200%.
On the right side of the page, charts display statistics about the current test case configuration. If changes are made to the configuration, a preview of the statistics is shown.
Weight Distribution: The distribution of test case weights. Visualizes the impact of each test case for the score calculation
Total Points: The percentage of points given to students according to a specific test case. 100% in the chart represents full scores (100%) of all students
Code Analysis Tab: Configure the visibility and grading of code quality issues on a category-level
Note
The Code Analysis Tab is only available if static code analysis was activated for the exercise.
Code quality issues found during the automatic assessment of a submission are grouped into categories. Artemis maps categories defined by the static code analysis tools to Artemis categories according to the following table:
Mapping
Category
Description
Java
Swift
C
Bad Practice
Code that violates recommended
and essential coding practices
Spotbugs BAD_PRACTICE
GCC BadPractice
Spotbugs I18N
PMD Best Practices
Code Style
Code that is confusing
and hard to maintain
Spotbugs STYLE
Swiftlint (all rules)
Checkstyle blocks
Checkstyle coding
Checkstyle modifier
PMD Code Style
Potential Bugs
Coding mistakes, error-prone
code or threading errors
Spotbugs CORRECTNESS
GCC Memory
Spotbugs MT_CORRECTNESS
PMD Error Prone
PMD Multithreading
Duplicated Code
Code clones
PMD CPD
Security
Vulnerable code, unchecked
inputs and security flaws
Spotbugs MALICIOUS_CODE
GCC Security
Spotbugs SECURITY
PMD Security
Performance
Inefficient code
Spotbugs PERFORMANCE
PMD Performance
Design
Program structure/architecture
and object design
Checkstyle design
PMD Design
Code Metrics
Violations of code complexity
metrics or size limitations
Checkstyle metrics
Checkstyle sizes
Documentation
Code with missing or flawed
documentation
Checkstyle javadoc
Checkstyle annotation
PMD Documentation
Naming & Format
Rules that ensure the readability
of the source code (name conventions,
imports, indentation, annotations,
white spaces)
Checkstyle imports
Checkstyle indentation
Checkstyle naming
Checkstyle whitespace
Miscellaneous
Uncategorized rules
Checkstyle miscellaneous
GCC Misc
Note
For Swift, only the category Code Style can contain code quality issues currently. All other categories displayed on the grading page are dummies.
Note
The GCC SCA option for C does not offer categories by default. The issues were categorized during parsing with respect to the rules.
Other languages use categories defined by their static code analysis tool:
JavaScript, TypeScript, C++ and R only use the Lint category.
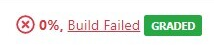
The template result should have a score of 0% with 0 of X passed or 0 of X passed, 0 issues (if static code analysis is enabled)
The solution result should have a score of 100% with X of X passed or X of X passed, 0 issues (if static code analysis is enabled)
Note
If static code analysis is enabled and issues are found in the template/solution result, instructors should improve the template/solution or disable the rule, which produced the unwanted/unimportant issue.
You can review differences between the template and solution repositories.
The comparison allows you to review the changes students are expected to make to the exercise template to solve the exercise.
Template/Solution Comparison in Exercise Management Page
You can open the comparison view by clicking the button.
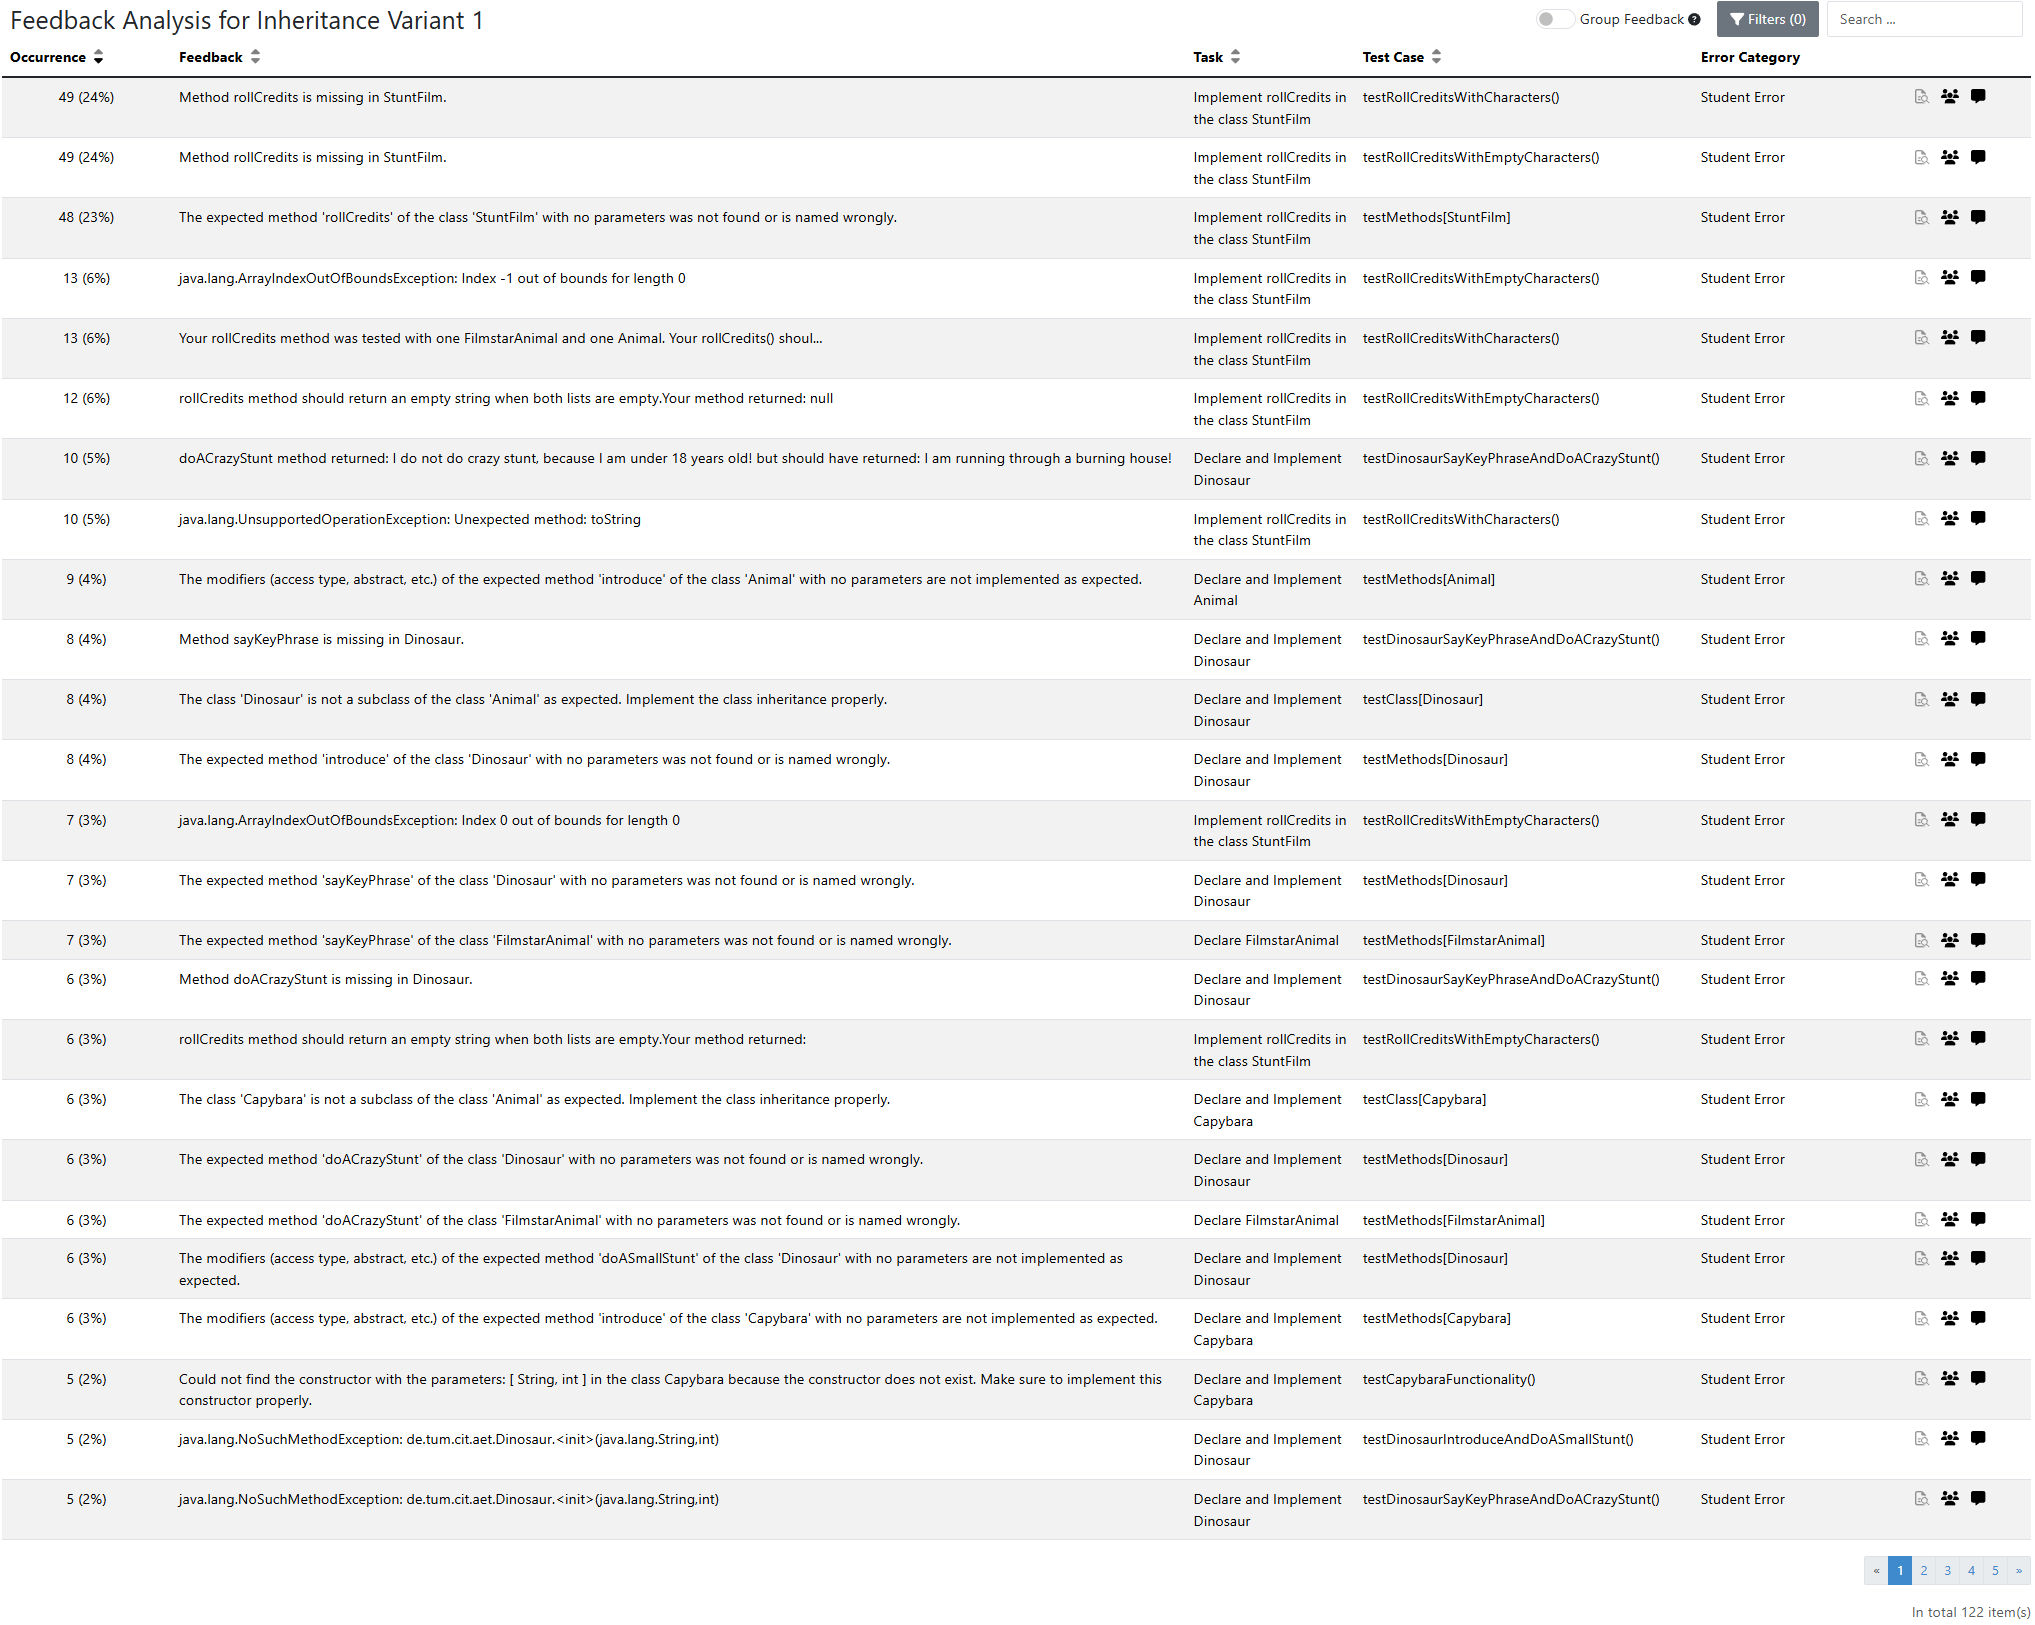
After verifying the exercise configuration, Artemis provides an advanced Feedback Analysis feature to help instructors and tutors identify common mistakes among students and improve grading efficiency.
Accessing Feedback Analysis
Navigate to the Exercise Management page.
Open a programming exercise and navigate to the grading section. Click on the Feedback Analysis tab.
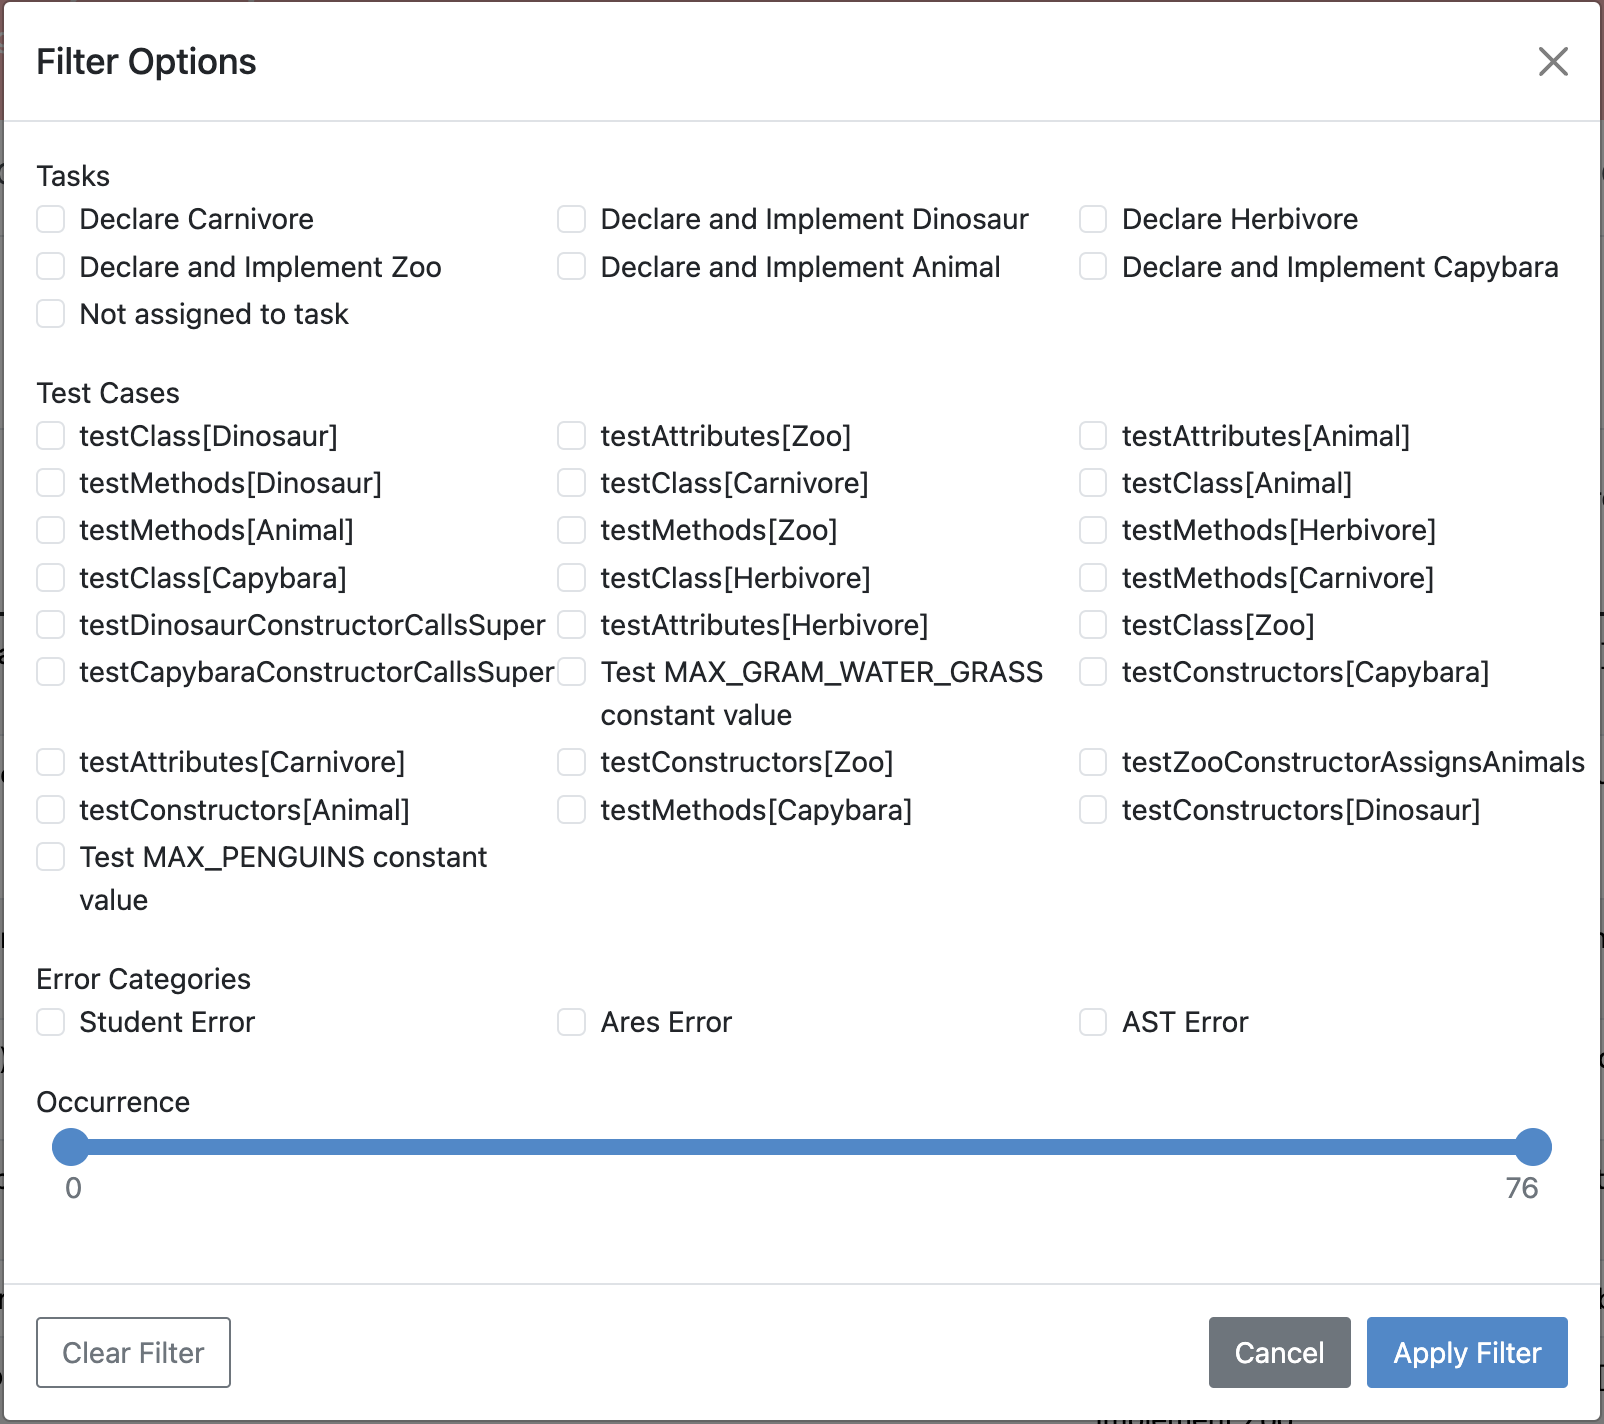
A structured table provides an overview of feedback occurrences, categorized by test cases, tasks, and error types.
To avoid many single entries in case of testcases using random values and generating similar feedback Groups similar feedback messages together all feedback to highlight frequently occurring errors.
Displays grouped occurrence counts and relative frequencies to help instructors prioritize common issues.
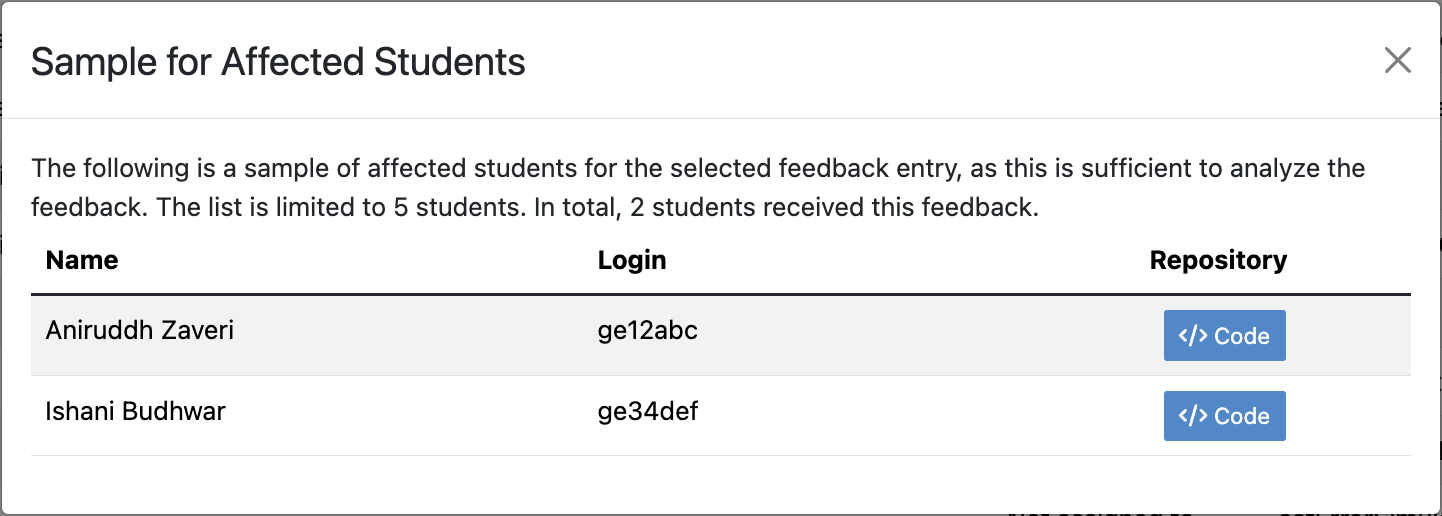
Detailed Feedback Inspection
Click on any feedback entry to view detailed feedback inspection.
Open a modal window to inspect for example feedback detailtexts which were too long and therefore had to be cut off in the table entry.
On exercise import, Artemis copies the repositories, build plans, interactive problem statement, and grading configuration from the imported exercise.
Open Course Management
Open
Navigate into Exercises of your preferred course
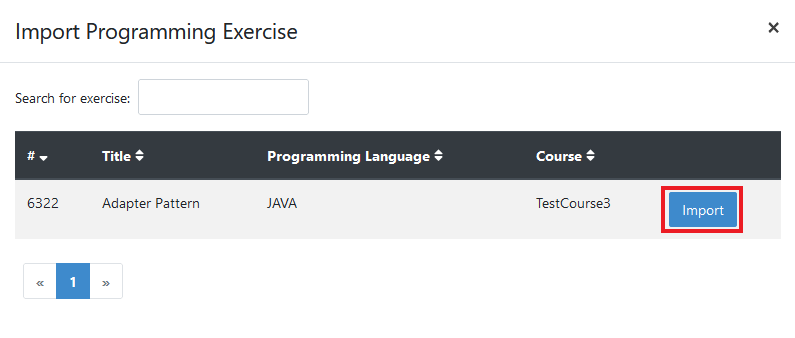
Import programming exercise
Click on Import Programming Exercise
Select an exercise to import
Note
Instructors can import exercises from courses in which they are registered as instructors.
Artemis provides special options to update the assessment process
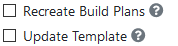
Recreate Build Plans: Create new build plans instead of copying them from the imported exercise
Update Template: Update the template files in the repositories. This can be useful if the imported exercise is old and contains outdated dependencies.
For Java, Artemis replaces JUnit4 with Ares (which includes JUnit5) and updates the dependencies and plugins with the versions found in the latest template.
Afterwards, you might need to adapt the test cases.
Instructors are able to activate/deactivate static code analysis. Changing this option from the original value requires the activation of Recreate Build Plans and Update Template.
Note
Recreate Build Plans and Update Template are automatically set if the static code analysis option changes compared to the imported exercise.
The plugins, dependencies, and static code analysis tool configurations are added/deleted/copied depending on the new and the original state of this option.
Fill out all mandatory values and click on
Note
The interactive problem statement can be edited after finishing the import. Some options such as Sequential Test Runs cannot be changed on exercise import.
All tool categories and their rules are active by default except for the NOISE and EXPERIMENTAL category.
Refer to the Spotbugs documentation for a description of all rules.
Checkstyle
This table contains all rules that are activated by default when creating a new programming exercise.
You can suppress a complete category by changing its visibility in the grading settings.
For a more fine-granular configuration, you can add or remove rules by editing the checkstyle-configuration.xml file.
For a description of the rules refer to the Checkstyle documentation.
Artemis uses the following default configuration to detect code duplications for the category Copy/Paste Detection.
For a description of the various PMD CPD configuration parameters refer to the PMD CPD documentation.
<!-- Minimum amount of duplicated tokens triggering the copy-paste detection --><minimumTokens>60</minimumTokens><!-- Ignore literal value differences when evaluating a duplicate block.If true, foo=42; and foo=43; will be seen as equivalent --><ignoreLiterals>true</ignoreLiterals><!-- Similar to ignoreLiterals but for identifiers, i.e. variable names, methods names.If activated, most tokens will be ignored so minimumTokens must be lowered significantly --><ignoreIdentifiers>false</ignoreIdentifiers>
For a description of the rules/warnings refer to the GCC Documentation.
For readability reasons the rule/warning prefix -Wanalyzer- is omitted.
Category (Tool/Artemis)
Rule
Memory Management
/ Potential Bugs
free-of-non-heap
malloc-leak
file-leak
mismatching-deallocation
Undefined Behavior
/ Potential Bugs
double-free
null-argument
use-after-free
use-of-uninitialized-value
write-to-const
write-to-string-literal
possible-null-argument
possible-null-dereference
Bad Practice/Bad Practice
double-fclose
too-complex
stale-setjmp-buffer
Security/Security
exposure-through-output-file
unsafe-call-within-signal-handler
use-of-pointer-in-stale-stack-frame
tainted-array-index
Miscellaneous/Miscellaneous
Rules not matching to above categories
Note
GCC output can still contain normal warnings and compilation errors. That will also be added to the Miscellaneous category.
Usually it’s best to disable this category, as it contains errors not related to the SCA.
Therefore, if the warning/error does not belong to first four above categories it is not an SCA issue as of GCC11.1.0.
The following sections explain the configuration options for submission policies:
The submission policy defines the effect that a submission has on the participation of one participant in a programming exercise.
A programming exercise might have no submission policy at all, or one submission policy, but never more than one. Submission policies are initially specified
in the creation process of a programming exercise and can later be adjusted in the grading configuration of the particular programming exercise.
Note
One submission is defined by one push to the exercise participation repository by the participant themself that triggers the
automatic tests resulting in feedback for the participant. Automatic test runs triggered by instructors are not considered submissions.
Choosing the right submission policy configuration depends on the exercise and your teaching style.
In general, lock repository and submission penalty policies combat trial-and-error solving approaches.
1. None
When selecting no submission policy, exercise participants can submit their solution as often as they want until the due date.
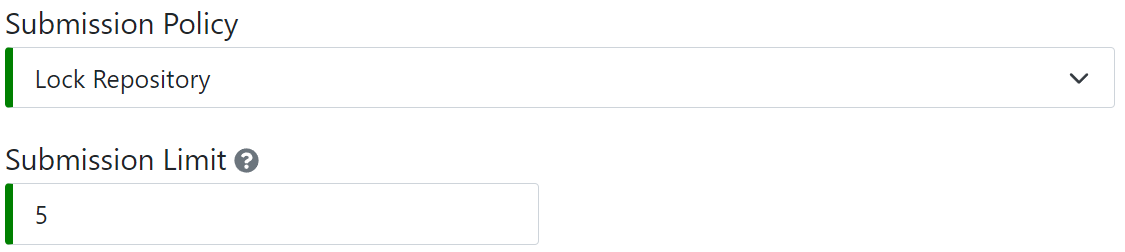
2. Lock Repository
Participants can submit a fixed number of times within the submission period of a programming exercise. Once the participant reaches the submission limit,
further participation in the exercise is prevented by locking the participation repository. The participant may still work on their solution locally, but
cannot submit it to Artemis to receive feedback.
With the example configuration shown in the figure above, participants can submit their solution 5 times and receive feedback 5 times.
After that, Artemis locks the participation repository, so the participant can no longer push their solutions to their repository.
Note
When locking the participation repository upon reaching the submission limit fails for any reason and the participant submits again,
Artemis attempts to lock the repository again and sets the newly generated result to .
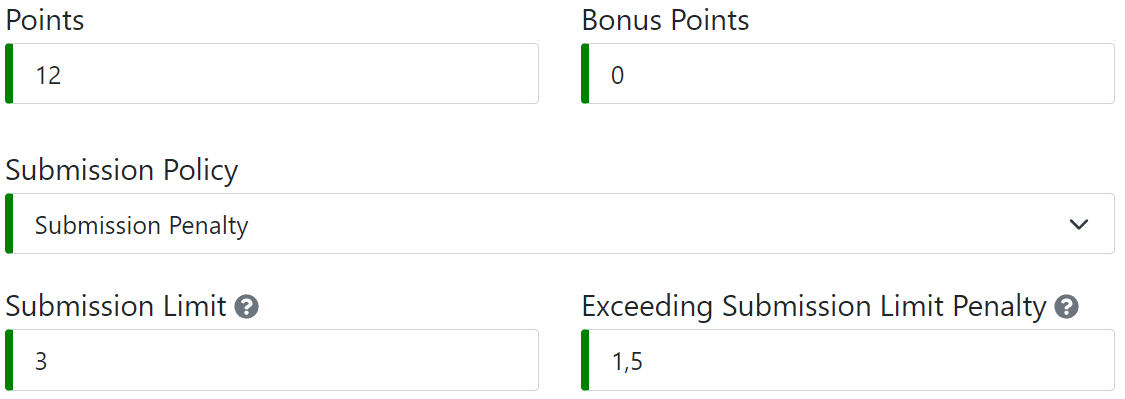
3. Submission Penalty
Participants can submit as often as they want until the due date, however, for each submission exceeding the submission limit,
the exceeding submission limit penalty is deducted from the participant’s score. The exceeding submission limit penalty must be
provided as a positive number of points.
With the example configuration shown in the figure above, participants can submit their solution 3 times regularly. For every
submission exceeding the limit of 3, 1.5 points are deducted from the participant’s score. The score cannot be negative.
For example, when the participant reaches 6 out of 12 points on the 4th submission, 1.5 points are deducted for the one submission exceeding
the limit of 3, resulting in a participation score of 4.5 instead of 6 out of 12. On the 5th submission, 3 points are deducted
for 2 submissions exceeding the limit. The student receives feedback that explains the deduction.
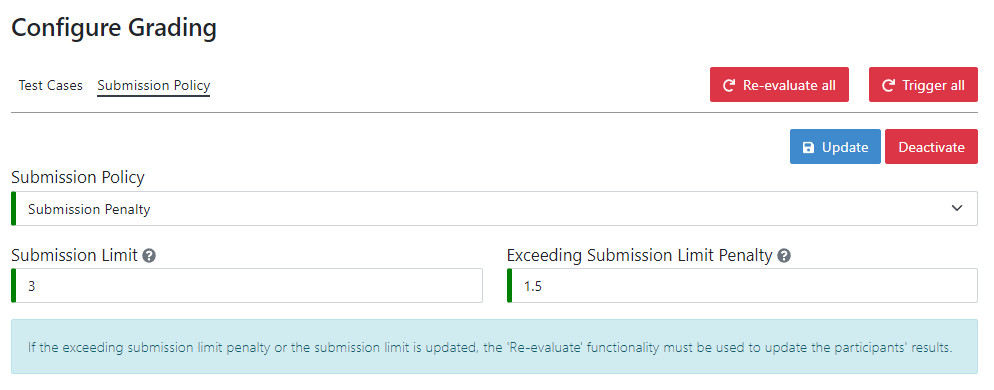
After generating a programming exercise initially, submission policies can be updated and toggled on the grading page
of the programming exercise.
1. (De)activating Submission Policies
When the submission policy of a programming exercise is active, the button is displayed.
When the policy is inactive, the button is displayed instead. The active submission policy of an exercise can
be deactivated by pressing . When the policy is deactivated, Artemis will no longer enforce the policy. Repositories that were
locked due to the enforcement of the submission policy, get unlocked. Submission policies can be activated again by pressing .
When (de)activating a submission penalty policy, must be pressed in order to apply the effect.
2. Updating Submission Policies
Submission policies can be updated during the exercise by modifying the configuration and pressing . When updating a policy,
the effect of the former policy is removed and the effect of the new policy is applied. When the new policy is a submission penalty policy,
must be pressed to update the latest results of all participants.
3. Deleting Submission Policies
Submission policies can be deleted by selecting None as submission policy type and pressing . When deleting submission policies,
their effect on participations is removed. Every repository that is locked due to a lock repository policy is unlocked and the
participant can continue working on the exercise. When deleting a submission penalty policy, must be pressed in order
to revert the submission policy effect.
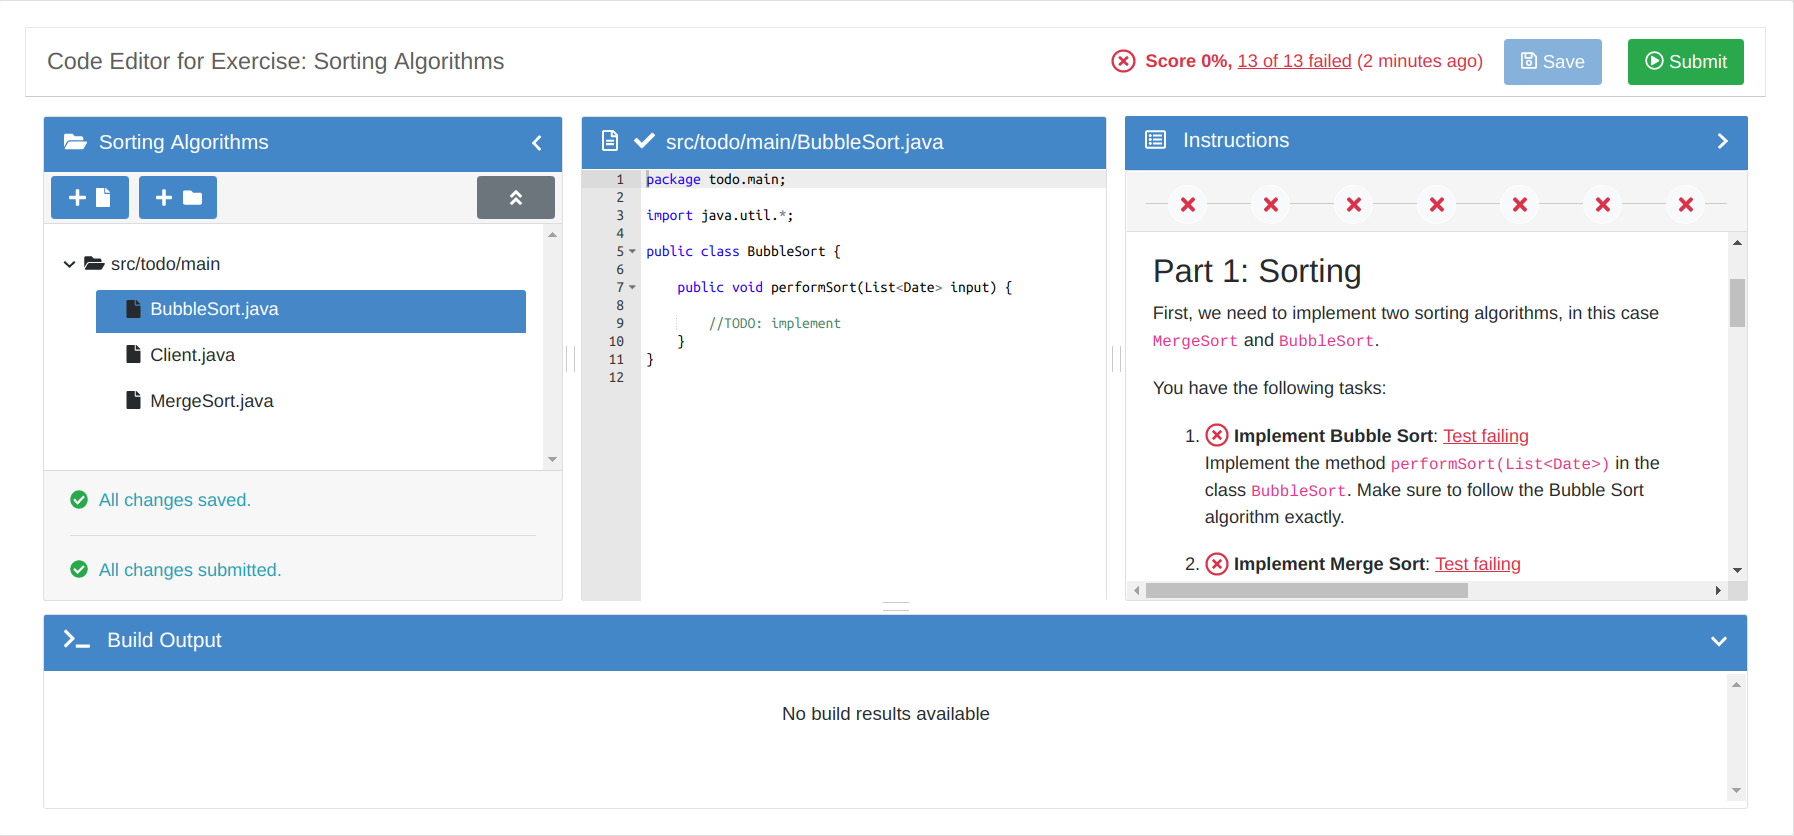
The following screenshot shows the online code editor with interactive
and dynamic exercise instructions on the right side. Tasks and UML
diagram elements are referenced by test cases and update their color
from red to green after students submit a new version and all test cases
associated with a task or diagram element pass. This allows the students
to immediately recognize which tasks are already fulfilled and is
particularly helpful for programming beginners.
The online editor displays only visible files, to avoid showing for example .git and .gitignore config files.
This also means that other config files, like SwiftLint’s .swiftlint.yml file, are not shown. Those files currently
can only be accessed via your own IDE.
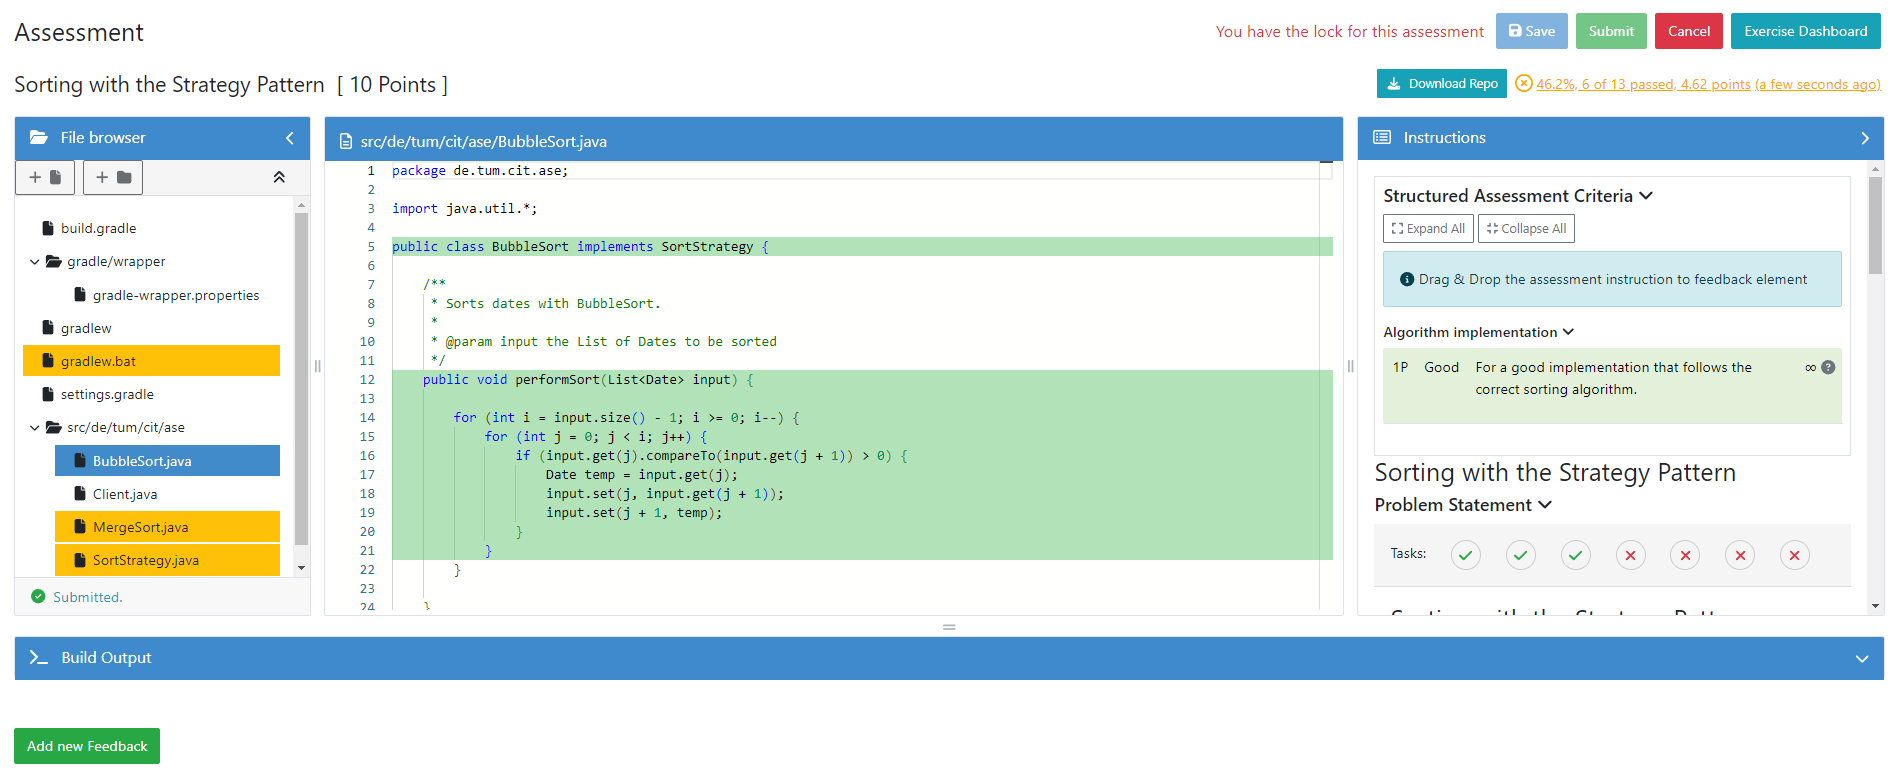
For manual assessment, the online editor provides the following features tailored to the assessment process:
File browser: The file browser shows the files in the student’s submission and allows you to navigate between them. Changed files are highlighted in yellow.
Build output: The build output shows the output of the build process, if any. This is useful in case of build errors.
Read-only editor: The read-only editor allows you to view the student’s code. It highlights all changed lines.
Instructions: The instructions provide the structured grading criteria and the problem statement, including the tasks the student has solved successfully as determined by the test cases of the exercise. You can review the test cases associated with each task by clicking on the number of passing tests next to the task, e.g.
Result: The top right corner holds the current result of the student’s submission. By clicking on it, you can review the test cases and feedback currently attached to the submission.
You can add feedback directly in the source code by first hovering over the line you want to comment on and then clicking the that appears next to the line number. Alternatively, when the editor is focused during assessment, press the “+” key (including the numpad “+”) to open the inline feedback widget at the current cursor line. Students will be able to see feedback added this way in the same location when viewing their assessed submission in the online editor.
After clicking the button, you can enter a feedback comment and assign a score for the selected line. Alternatively, you can drag one of the structured assessment criteria from the instructions to the feedback area to apply it to the feedback widget.
When you are done, click the button to save your feedback or the button to discard it.
You can also add general feedback by scrolling to the bottom of the page and clicking . Feedback given this way is not tied to any specific file or line of code.
To save your changes, click the button at the top right of the page. To finalize the assessment, click the button. Note that you can save your assessment multiple times before submitting it.
Once submitted, you cannot make any further changes to the assessment unless you are an instructor.
If you are a student, and want to know how to use the Artemis Version Control for checking out repositories locally, checkout the guide on Integrated Code Lifecycle Setup.
The following tables lists the different types of repositories and gives an overview of the access rights different users have.
To gain these access rights, a user must assume the indicated role in the course the repository belongs to.
The different repository types are:
Base:
This includes all repositories that are set up when the exercise is created (template repository, solution repository, tests repository, auxiliary repositories).
Student Assignment:
A student’s assignment repository copied from the template repository. This includes team assignment repositories.
Teaching Assistant (TA) Assignment:
An assignment repository created by a teaching assistant for themself.
Instructor Assignment:
An assignment repository created by an editor or instructor for themselves. Not available for exam exercises.
Student Practice:
A student’s practice repository copied either from the template repository, or from their assignment repository. Can only be created after the due date of the exercise has passed. Not available for exam exercises.
Teaching Assistant (TA) Practice:
A practice repository created by a teaching assistant for themself. Not available for exam exercises.
Instructor Practice:
A practice repository created by an editor or instructor for themselves. Not available for exam exercises.
Instructor Exam Test Run:
A test run repository created by an editor or instructor for an exam. An instructor can create an exam test run before the start date of the exam to allow the instructor to test the exam from a student perspective before releasing it. This repository should be deleted before the exam is conducted.
The different roles are:
Student (S):
A student in the course.
Teaching Assistant (TA):
A teaching assistant (tutor) in the course.
Editor:
An editor in the course.
Instructor (I):
An instructor in the course.
Note
Editors and instructors are included in the role “Instructor” in the table as both roles have the same access rights.
The different points in time are:
Before start:
Before the exercise start date for a course exercise, before the exam start date for an exam exercise.
Working time:
After the exercise start date for a course exercise, after the exam release date for an exam exercise, before the due date for a course exercise, before the exam end date for an exam exercise.
After due:
After the due date for a course exercise, after the exam end date for an exam exercise.
Note
For the Instructor Exam Test Run Repository, the point in time “Before start” is the start date of the test run, and the point in time “After due” is the end date of the test run. Both are before the exam start date.
Read access (R) includes gitfetch, gitclone, and gitpull, if you are using your local Git client to access the repository.
Write access (W) corresponds to gitpush if you are using your local Git client.
Repository type
Role
Point in time
Access
Base
S
all
none
TA
all
R
I
all
R/W
Student Assignment
S
Before start
none
S
Working time
R/W
S
After due
R 1
TA
all
R
I
all
R/W
TA Assignment
S
all
none
TA
Before start
R
TA
Working time
R/W
TA
After due
R
I
all
R/W
Instructor Assignment
S
all
none
TA
all
R
I
all
R/W 2
Student Practice
S
Before start
none
S
Working time
none
S
After due
R/W
TA
Before start
none
TA
Working time
none
TA
After due
R
I
Before start
none
I
Working time
none
I
After due
R/W
TA Practice
S
all
none
TA
Before start
none
TA
Working time
none
TA
After due
R/W
I
Before start
none
I
Working time
none
I
After due
R/W
Instructor Practice
S
all
none
TA
Before start
none
TA
Working time
none
TA
After due
R
I
Before start
none
I
Working time
none
I
After due
R/W
Instructor Exam Test Run
S
all
none
TA
all
R
I
all
R/W
1) Only valid for course exercises.
Students cannot read their repository for exam exercises after the due date.
2) The instructor can access the Instructor Assignment repository using the online editor either from the Edit in editor view accessed via the Course Management (-> Exercises -> Edit in editor) or from the Course Overview (clicking on the course card -> Open code editor).
After the due date of the exercise has passed, the instructor can push to the repository only via the online editor reached from the Course Management or using their local Git client.
The online editor accessible from the Course Overview will show that the repository is locked, as it does for all students taking part in the course.
Note
The Practice repositories as well as the TA assignment repository and the instructor assignment repository in the table above only exist for course exercises.
The following sections describe best practices for writing test cases.
The examples and explanations are specifically written for Java (using Ares/JUnit5), but the practices can also be generalized
for other programming languages.
These comments should contain information about what is tested specifically, which task from the problem statement
is addressed or which TODO (if there are numbered TODOs in the template), how many points this test is worth when
passed and more if necessary. But make sure to keep the information consistent with the settings on Artemis like the weight of each testcase.
/** * Tests that borrow() in Book successfully sets the available attribute to false * Problem Statement Task 2.1 * Worth 1.5 Points (Weight: 1) */@TestpublicvoidtestBorrowInBook(){// Test Code}
Better yet, for manual correction, use these comments in the display name of the test. This allows the assessors, who execute the
tests in the IDE, to have more meaningful names displayed. The following example would make counting points easier.
@DisplayName("1.5 P | Books can be borrowed successfully")@TestpublicvoidtestBorrowInBook(){// Test Code}
Use Appropriate and Descriptive Names for Test Cases
After exercises and exams, test names will be used to create statistics. If the tests are called test1, test2, test3,
it will be hard to read those statistics. This is the same reason as to why you should not name your variables inta,
doubleb, Stringc. For example, if you want to test the method borrow in the class Book,
testBorrowInBook() would be an appropriate name for the test case.
@TestpublicvoidtestBorrowInBook(){// Test Code}
If you have many tests in different (nested) classes that are not completely distinct, add the name of the tested
class to the test to avoid having two tests with the same names. For example, if you test both add methods of a
LinkedList and an ArrayList. Having the same test name will lead to errors on Artemis.
Clearer test names also makes it easier to read and configure the grading in Artemis.
@Testpublicvoidtest_LinkedList_add(){// Test Code}
Hint
For Java exercises: If all test methods are in a single class this is not necessary, because the Java compiler
won’t allow multiple methods with override-equivalent signatures.
Use Appropriate Timeouts for Test Cases
For regular test cases, using a @StrictTimeout(1) annotation is enough. This represents a strict timeout of one
second. The value type of the strict timeout annotation defaults to seconds. If you need a shorter timeout, you can use
@StrictTimeout(value=500,unit=TimeUnit.MILLISECONDS). This annotation can also be added over a test class.
In that case the timeout applies individually to every test in that class.
@Test@StrictTimeout(1)publicvoidtestBorrowInBook(){// Test Code}
Note
When defining timeouts, you should take into account that the tests are run on a Continuous Integration Server
(using build agents). The tests will most likely execute a lot faster on your local machine.
Avoiding Assert Statements
Instead use conditional fail() calls to hide confusing information from the students. This could be considered a
bad practice in regular testing but it helps to create fail messages that are less confusing, especially for beginners.
Additionally, this also hides information about test implementation details, if the specific inputs or expected outputs
should stay unknown to students.
@TestpublicvoidtestBorrowInBook(){Objectbook=newInstance("Book",0,"Some title");invokeMethod(book,"borrow");assertFalse((Boolean)invokeMethod(book,"isAvailable"),"A borrowed book must be unavailable!");}
If the student fails the test, Artemis will display something like org.opentest4j.AssertionFailedError: A borrowed book must be unavailable! ==> Expected <false> but was <true>.
The part after ‘==>’ should not be shown to the student as it contains implementation detail.
@TestpublicvoidtestBorrowInBook(){Objectbook=newInstance("Book",0,"Some title");invokeMethod(book,"borrow");if((Boolean)invokeMethod(book,"isAvailable")){fail("A borrowed book is not available anymore!");}}
This will just display the message ‘org.opentest4j.AssertionFailedError: A borrowed book is not available anymore!’, which focuses, except for the first part, on the actual error instead of test internals.
Write Tests that are as Independent of the Student’s Code as Possible
Students can break everything and will break everything. Avoid direct code references and use reflective operations
instead. That way if a student modifies the template by accident and the test code would normally not compile,
they still get more meaningful feedback than a simple build error.
@TestpublicvoidtestBorrowInBook(){Bookbook=newBook(0,"Some title");book.borrow();if(book.isAvailable()){fail("A borrowed book must be unavailable!");}}
The code above will lead to a build error, if the student accidentally changes the Book class. Test code build errors
usually have a cryptic fail messages and it should be avoided that students see those confusing error messages.
@TestpublicvoidtestBorrowInBook(){Objectbook=newInstance("Book",0,"Some title");invokeMethod(book,"borrow");if((Boolean)invokeMethod(book,"isAvailable")){fail("A borrowed book must be unavailable!");}}
The code above will lead to an error message like The class ‘Book’ was not found within the submission. Make sure to implement it properly.
The message is clear and tells the student exactly what is wrong with their code.
Check for Hard-Coded Student Solutions
It is possible that students hardcode values to pass a certain set of tests. Therefore, you should check whether this
is the case or not. This is especially important in an exam setting, so students don’t get awarded points for a
solution that does not fulfill the requirements described in the problem statement.
Avoid Relying on a Specific Order in which Students Solve the Tasks
Tests should successfully cover one aspect of the submission without requiring the implementation of a different part
of the exercise, even if those aspects are heavily coupled.
In this example, the student is supposed to expand the translate method first and after that the
runService method:
publicStringtranslate(Stringword,Stringlanguage){returnswitch(language){caseTranslationService.LANGUAGE_GERMAN->translateToGerman(word);// TODO: Add a case for the French languagedefault->thrownewIllegalStateException("Illegal language requested: "+language);};}
publicStringrunService(StringserviceName,Stringparameter){Stringresult=null;if(serviceName.equals(TranslationService.SERVICE_NAME_TRANSLATION_GERMAN)){result=translate(parameter,TranslationService.LANGUAGE_GERMAN);}// TODO: Add a case for the French languageelse{System.out.println("Can't offer service "+serviceName);}returnresult;}
There are two separate tests, one testing the translation and the other one testing the runService method.
The test for runService must not assume that the translate method is already implemented correctly.
A possible solution for this problem could look like this:
This test correctly checks, if the student added the case for the French language and called the appropriate method
with the appropriate parameters. Because the translation method was overridden, it doesn’t matter whether the student
has already completed the previous task or not.
Note
If you use the this technique, you should have some way to deal with students that make the class or method final, either via
problem statement or test. Otherwise students get compilation errors in the test code.
Catch Possible Student Errors
Handle possible student mistakes appropriately in the test case. For example, if a method of the student returns null
and this is not handled appropriately in the test, this might produce a NullPointerException, which will lead to a
cryptic fail message. A null check in the test case allows providing a more clear fail message to the student.
Use Constant String Attributes to Represent the Base Package
Some courses use long package identifiers like de.tum.in.ase.pse. When instantiating objects with reflections,
the instantiation method usually takes the full canonical name of a class, which is de.tum.in.ase.pse.Book for example.
To avoid writing out this full canonical name all the time, you can add a constant String attribute representing the
base package name to the top of your test class.
privatestaticfinalStringBASE_PACKAGE="de.tum.in.ase.pse.";@TestpublicvoidtestBorrowInBook(){Objectbook=newInstance(BASE_PACKAGE+"Book",0,"Some title");// Test Code}
Use JUnit5 and Ares Features
More information can be found in the JUnit5 and
Ares documentation. The following list adds some
useful notes:
In combination with display names for both tests and the nested classes, this allows to structure grading with
tests and the grouping is also helpful when executing the test in the IDE. One example would be to structure the
tests by exercise sub-tasks or to group tests that all check a single more complicated method. You can also do this
by using static nested classes instead of inner classes annotated with @Nested (decide depending on your scenario).
Define a custom, well-structured and predictable test execution order with @Order
If you test multiple cases in a single test (e.g. because you want “all or nothing” grading for those cases or simply
check with multiple inputs), you can use assertDoesNotThrow
to pass a message that is displayed in Artemis, in case an exception occurs in the student code.
If you want to test multiple assertions that are fairly independent in a single test (e.g. because you want
“all or nothing” grading for those cases or simply check with multiple inputs) you should consider if
assertAll
is what you need. This will execute all passed executables and aggregate the failures, which allows showing students
multiple wrong aspects of their solution directly.
If you have special needs, consider using Dynamic Tests
and/or write your own extension.
If you need to test tests, use the JUnit Platform Test Kit.
For providing wrong implementations that students need to test, consider
passing interface implementations (easiest and safe) → pure Java
pass mocked objects (flexible and safe, students don’t need to know) → EasyMock/Mockito
mock single methods of tested objects (partial mock) or mock constructors → one of the above plus PowerMock
Define your own Annotations
Own annotations are an easy and powerful tool that keeps your code readable. This example defines an annotation
that combines both test and strict timeout.
Jqwik allows testing with arbitrary inputs and shrinks the test errors, resulting in excellent
counter examples when student code fails (usually exactly the edge case).
Eclipse Compiler and Best-Effort Compilation
Use the Eclipse Java Compiler for partial, best-effort compilation. This is particularly useful for exam exercises and
other more “dirty” programming work. It is also useful for testing complicated generics (you really don’t want to do
that with java reflection). This causes compilation errors to be transformed into errors that are thrown where code
does not compile. This is done on method and class level (essentially replacing the body of the class/method with
thrownewError("Unresolvedcompilationproblems:..."), which is then thrown whenever the class/method is used).
If you intend to write tests that exploit that, make sure that only the body of the test methods does not compile
(e.g. if a student didn’t implement something from a task). If your complete test class does not compile, this causes
the complete test class initialization to fail, which results in cryptic feedback in Artemis. Anything in the test class
that is not a method body or nested class body must compile. This includes method return types and parameter types,
and therefore also lambdas! You can avoid that by using e.g. the Object class and cast inside / at the call site.
Use e.g. a nested class for Fields, Field types and Methods with student class return/parameter types that could
potentially not compile. Because the nested class is a separate class which is loaded separately, the top level test
class will still load successfully and only methods using that nested class will fail due to the error from the nested
class initialization.
You can choose to use the Eclipse compiler for both student and test code, or for test code only, depending on whether
you want to grade not fully compiling code.
Note
The Eclipse Compiler released under this maven coordinate does not always support the latest Java version. You can
still compile student code with the latest Java version and only the test code with the previous.
The Reflection API is limited when it comes to constant attributes. Constant attributes are static final attributes
with a primitive or String type. Java inlines such attributes during compile-time, which makes it more or less
impossible to change the value during runtime.
Be careful with long output, arrays or Strings. This might be unreadable in Artemis or even cut of after 5000 characters.
Per default the results of all unit tests are extracted and sent back to Artemis without any further manual interaction needed.
Only for some custom setups a semi-automatic approach might be necessary.
In the Jenkins CI-System the test case feedbacks are extracted from XML-Files in the JUnit format.
The Jenkins plugins reads all such files from a folder results in the top level of the Jenkins workspace.
The files resulting from the execution of regular executed unit tests are copied to this folder automatically.
To add additional custom test case feedbacks another mechanism is provided by creating a folder
customFeedbacks also on the top level of the workspace.
In this folder an arbitrary number of JSON-Files can be created.
Each one represents a single test case feedback and should have the format:
{"name":string,"successful":boolean,"message":string}
name: This is the name of the test case as it will be shown for example on the ‘Configure Grading’ page.
It should therefore have a for this exercise uniquely identifiable name and has to be non-null and not empty.
successful: Indicates if the test case execution for this submission should be marked as successful or failed.
Defaults to false if not present.
message: The message shown as additional information to the student.
Required for non-successful tests/feedback, optional otherwise.
The Artemis Integrated Code Lifecycle system allows you to use programming exercises fully integrated within Artemis, without the need of any external tools.
Find more information on it here.


 to create the exercise
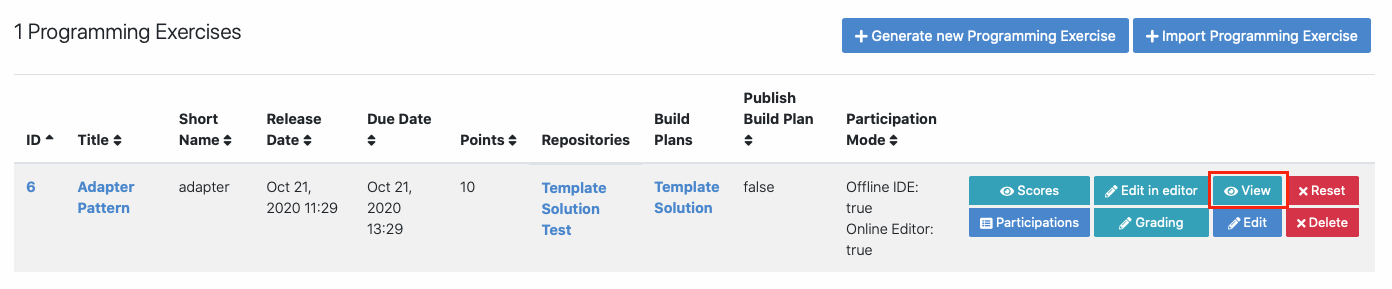
 in Artemis (in the browser) and adapt the code in the online code editor
 the code when needed
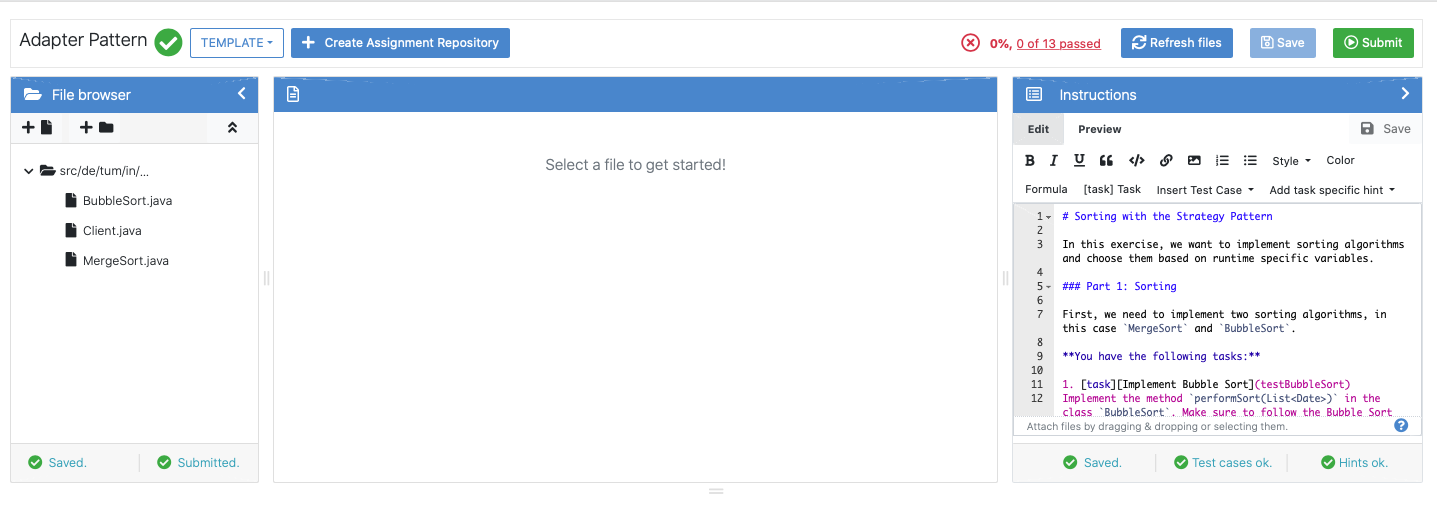


 button of the programming exercise or navigate into
  Save the current grading configuration of the open tab
 Reset the current grading configuration of the open tab to the default values. For Test Case Tab, all test cases are set to weight 1, bonus multiplier 1, and bonus points 0. For the Code Analysis Tab, the default configuration depends on the selected programming language.
 Re-evaluates all scores according to the currently saved settings using the individual feedback stored in the database.
 Trigger all build plans. This leads to the creation of new results using the updated grading configuration.
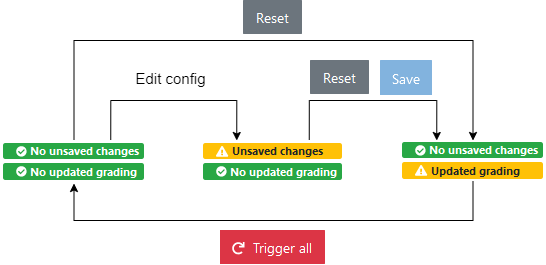

 page of the programming exercise
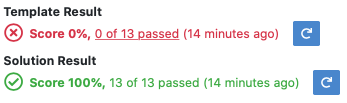

 button.
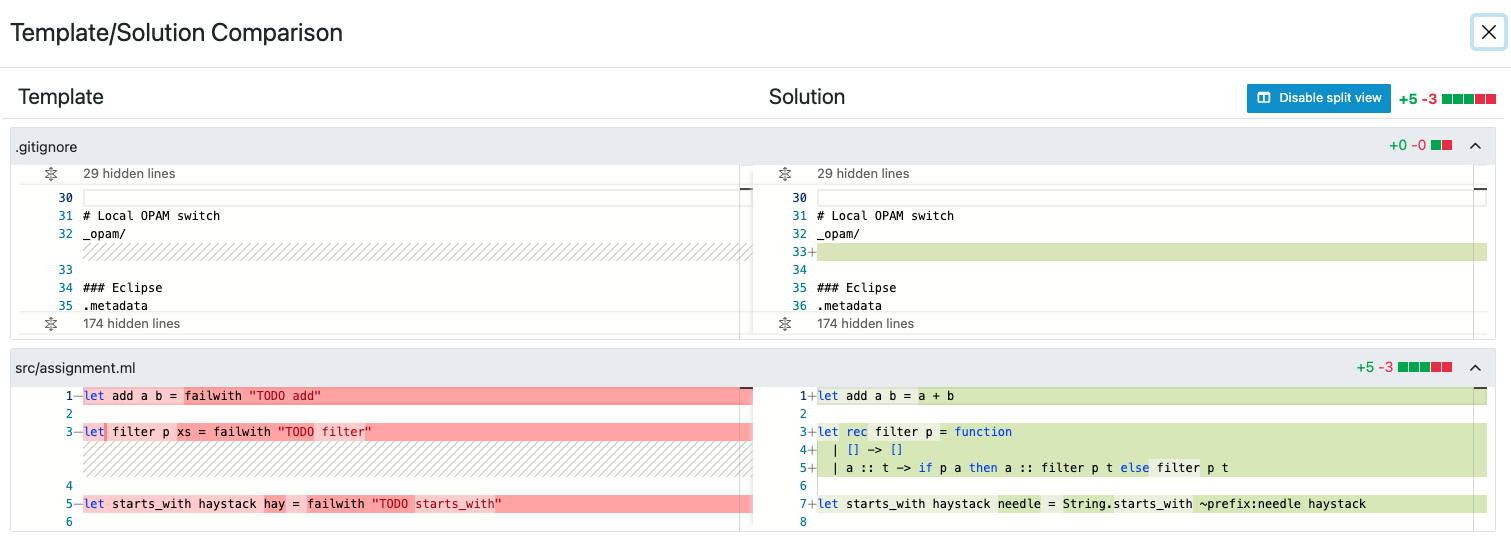


 .
.


 button is displayed.
When the policy is inactive, the
button is displayed.
When the policy is inactive, the  button is displayed instead. The active submission policy of an exercise can
be deactivated by pressing
button is displayed instead. The active submission policy of an exercise can
be deactivated by pressing  . When updating a policy,
the effect of the former policy is removed and the effect of the new policy is applied. When the new policy is a submission penalty policy,
. When updating a policy,
the effect of the former policy is removed and the effect of the new policy is applied. When the new policy is a submission penalty policy,

 that appears next to the line number. Alternatively, when the editor is focused during assessment, press the “+” key (including the numpad “+”) to open the inline feedback widget at the current cursor line. Students will be able to see feedback added this way in the same location when viewing their assessed submission in the online editor.
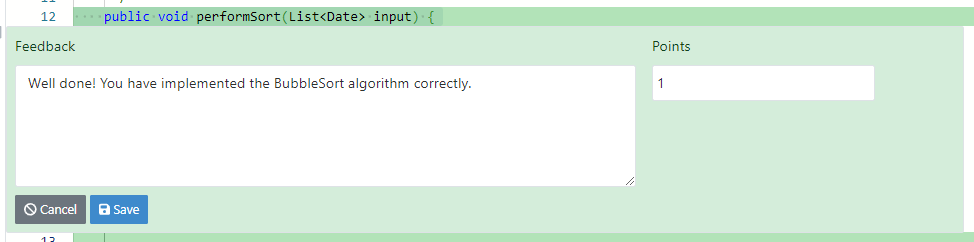
 button to save your feedback or the
  button to discard it.
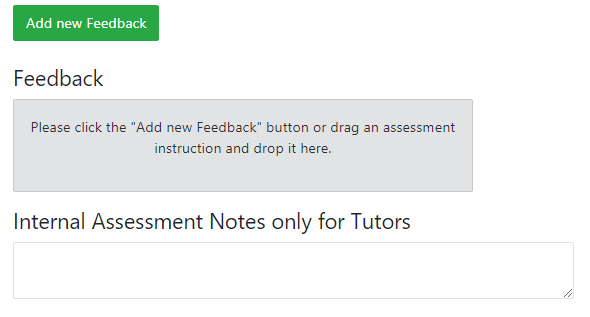
 . Feedback given this way is not tied to any specific file or line of code.
 button. Note that you can save your assessment multiple times before submitting it.
Once submitted, you cannot make any further changes to the assessment unless you are an instructor.
button. Note that you can save your assessment multiple times before submitting it.
Once submitted, you cannot make any further changes to the assessment unless you are an instructor.