Orion
Overview
The Orion plugin for JetBrains IDEs supports students, teaching assistants (tutors), and instructors with the conduction of programming exercises. It integrates Artemis in all JetBrains IDEs and automates the download (clone) and upload (push) of exercises.
Installation
Orion is installed like every other plugin via your JetBrains IDE’s marketplace. Alternatively, although usually not needed, it is possible to install builds directly from Orion’s GitHub repository. The installation process is described in the readme.
General Usage
After installation, Orion provides a custom tool window at View -> Tool Windows -> Artemis. This window contains an integrated browser displaying Artemis.
At the top of the tool window are the following buttons:
A help button
 , which opens this documentation page.
A back button
 . Clicking it returns to the initially opened page, that is:
The exercise details page if an exercise is opened as a student.
The exercise edit in editor page if an exercise is opened as an instructor.
The assessment dashboard if an exercise is opened as a tutor, or, if a submission is downloaded, the assessment details page of that submission.
The Artemis home page if no Artemis project is opened.
If you opened this page in Orion, use the back button to return to Artemis.
Settings
Orion’s settings are at Settings -> Tools -> Orion. The settings include:
Artemis base url: Can be changed to switch to a specific Artemis instance. Defaults to https://artemis.tum.de. Important: The url must not end with a
/, otherwise it does not work!Artemis git url: Can be changed to switch to a specific Artemis instance. Defaults to https://artemis.tum.de/git
Artemis exercise paths: Orion suggests to store newly downloaded exercises at
default-path/course/exercise-name, with the default path dependent of the setting.Default commit message: The default message for each commit.
Change user agent: The user agent is sent to Artemis to identify Orion. Usually, no changes are required.
Restart the integrated browser: If Orion gets stuck, restarting the browser might solve the issue without restarting your IDE.
Problems
Please report any issues on Orion’s GitHub repository.
Participation in Orion
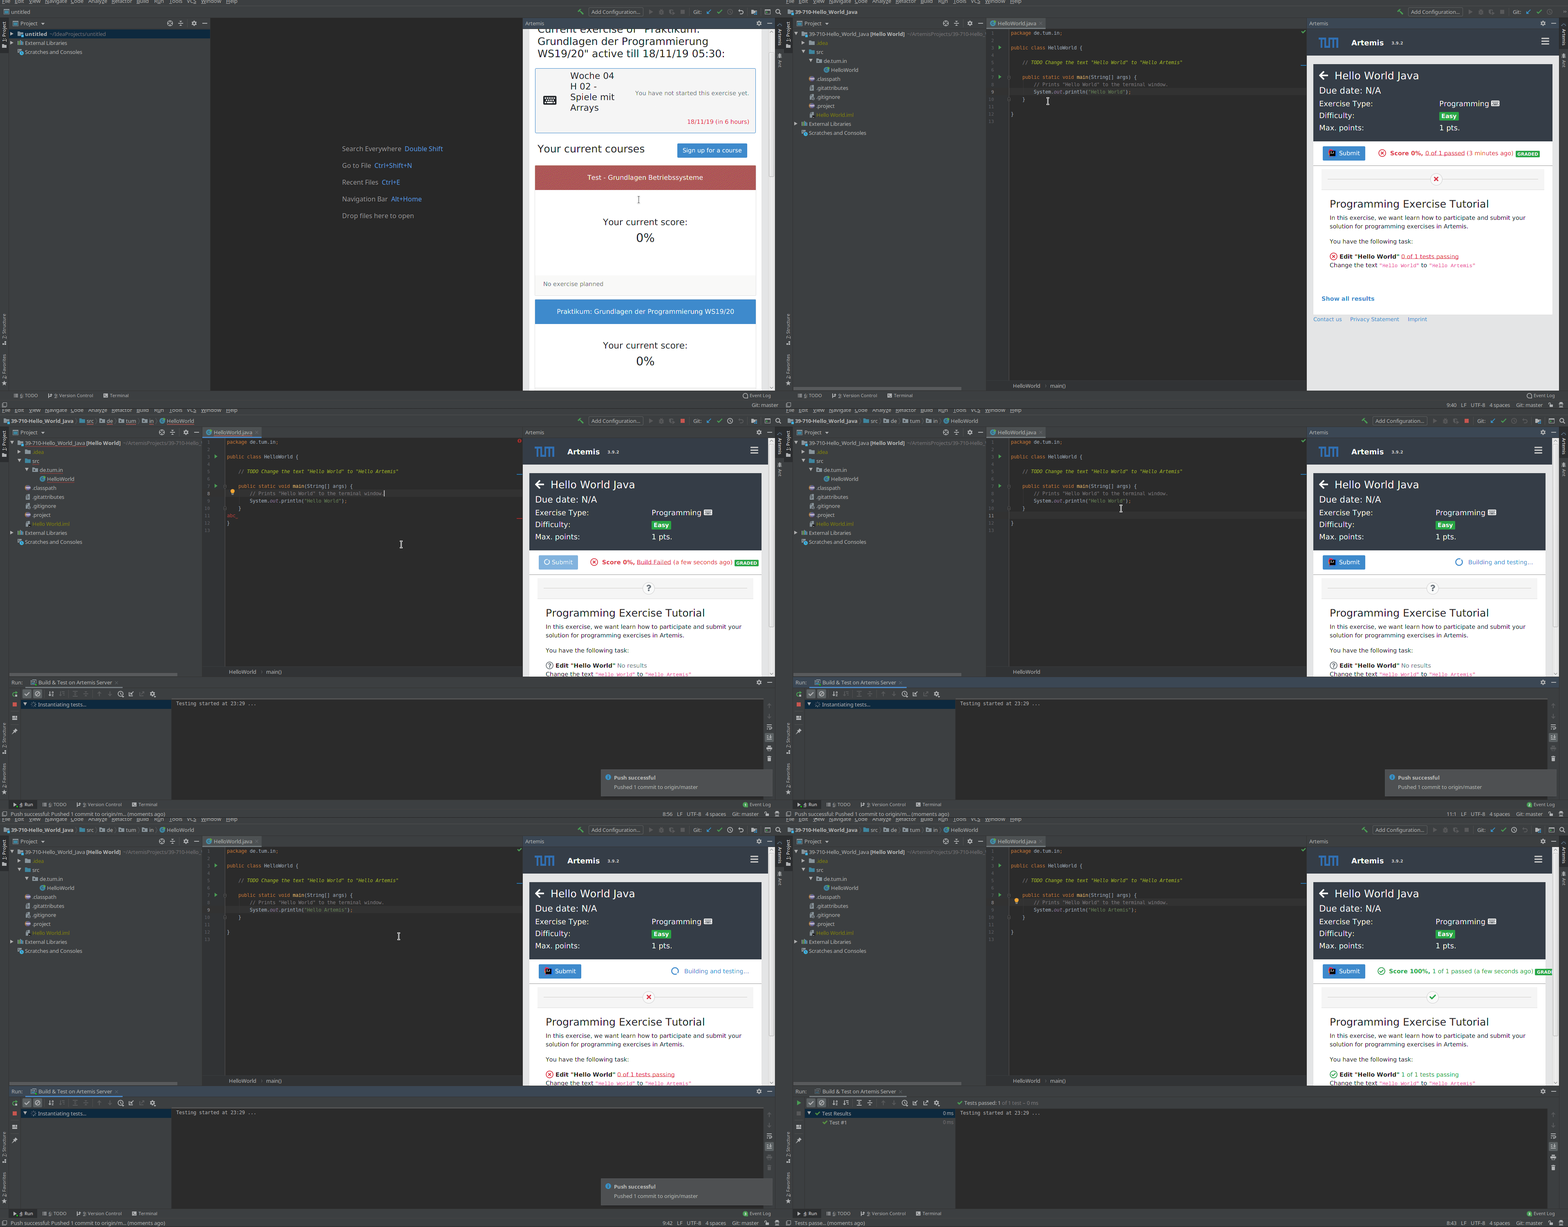
Students can participate in programming exercises via Orion by performing the following steps:
Navigate to the exercise using the integrated browser.
After starting the exercise, click
.
After cloning, the exercise can be solved in your IDE.
To submit the changes, click
. This automatically commits and pushes the local changes and displays the result of the automatic tests in your IDE.
A Gif showcasing the usage for students:
Local Testing in Orion
Students can download tests and test their code locally. This requires that the exercise allows local testing by the instructor by enabling “Include tests into example solution” in the exercise settings.
Navigate to the exercise using the integrated browser.
After starting the exercise, click
.
After cloning, the exercise can be solved in your IDE.
To download tests, click
. This downloads the test repository and sets it up for local testing.
Feedback Mode in Orion
Students can view Feedback in their IDE using Orion. This requires, that the exercise has manual tutor feedback enabled. After the deadline has passed and the student received tutor feedback, Orion enters the feedback mode and embeds feedback into the files.
Open the exercise with Orion
Wait until the deadline has passed
Review feedback inside of the IDE
Exercise Creation in Orion
Instructors can set up programming exercises via Orion by performing the following steps:
The exercise needs to be created as described at the exercise creation of programming exercises, step 1 and 2.
After the creation, navigate to the instructor exercise overview using the integrated browser.
Each programming exercise provides a button to edit the exercise in Orion
. The button is rightmost in the table and might require scrolling. Clicking it downloads the template, solution and test repository of the exercise.
Edit the repository files in your IDE.
To submit the changes, click
. This commits and pushes all local changes to their respective repository.
The integrated browser displays the editor to update the problem statement.
To test the code locally, click
, which copies the tests with the local template or solution (whichever was selected) into a new folder and executes them locally.
Assessment in Orion
Tutors can assess programming exercises via Orion by performing the following steps:
Navigate to the assessment dashboard of the exercise using the integrated browser.
Click
to automatically set up the assessment project.
After downloading or opening the project in your IDE, the submission overview is shown in the integrated browser. Each submission can be opened in Orion. To start a new submission, click
. This downloads the submission files and overwrites the previous submission.
The student’s code is located in the directories
assignmentandstudentSubmission(assignmentcontains the files that can be edited,studentSubmissioncontains an uneditable copy that can be assessed). The tests are in the directorytests.Opening a file in either
assignmentorstudentSubmissionopens the editor with two available modes that can be switched using the tabs at the bottom of the editor.
In edit mode (“Text” tab), the files can be edited regularly, e.g. to try out fixes.
The diff mode (“Diff” tab), in which the student code is compared to the code of the template repository.
In assessment mode (“Assessment” tab), the student’s submission without the local changes is displayed in read-only mode. In this mode, assessment comments can be added, similar to the assessment in Artemis. Click the plus on the gutter on the left of the editor to add a new comment.
The integrated browser displays the problem statement, the assessment instructions, and the buttons to edit the general feedback.
